# ubo_app
**Repository Path**: jerrykingnice/ubo_app
## Basic Information
- **Project Name**: ubo_app
- **Description**: No description available
- **Primary Language**: Unknown
- **License**: Not specified
- **Default Branch**: main
- **Homepage**: None
- **GVP Project**: No
## Statistics
- **Stars**: 0
- **Forks**: 0
- **Created**: 2024-06-10
- **Last Updated**: 2024-12-01
## Categories & Tags
**Categories**: Uncategorized
**Tags**: None
## README
# 🚀 Ubo App
[](https://pypi.python.org/pypi/ubo-app)
[](https://github.com/ubopod/ubo-app/LICENSE)
[](https://pypi.python.org/pypi/ubo-app)
[](https://github.com/ubopod/ubo-app/actions)
[](https://codecov.io/gh/ubopod/ubo-app)
## 🌟 Overview
Ubo App is a Python application for managing Raspberry Pi utilities and Ubo-specific
features.
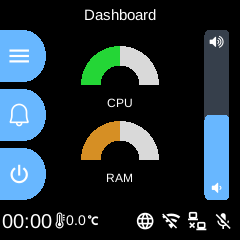
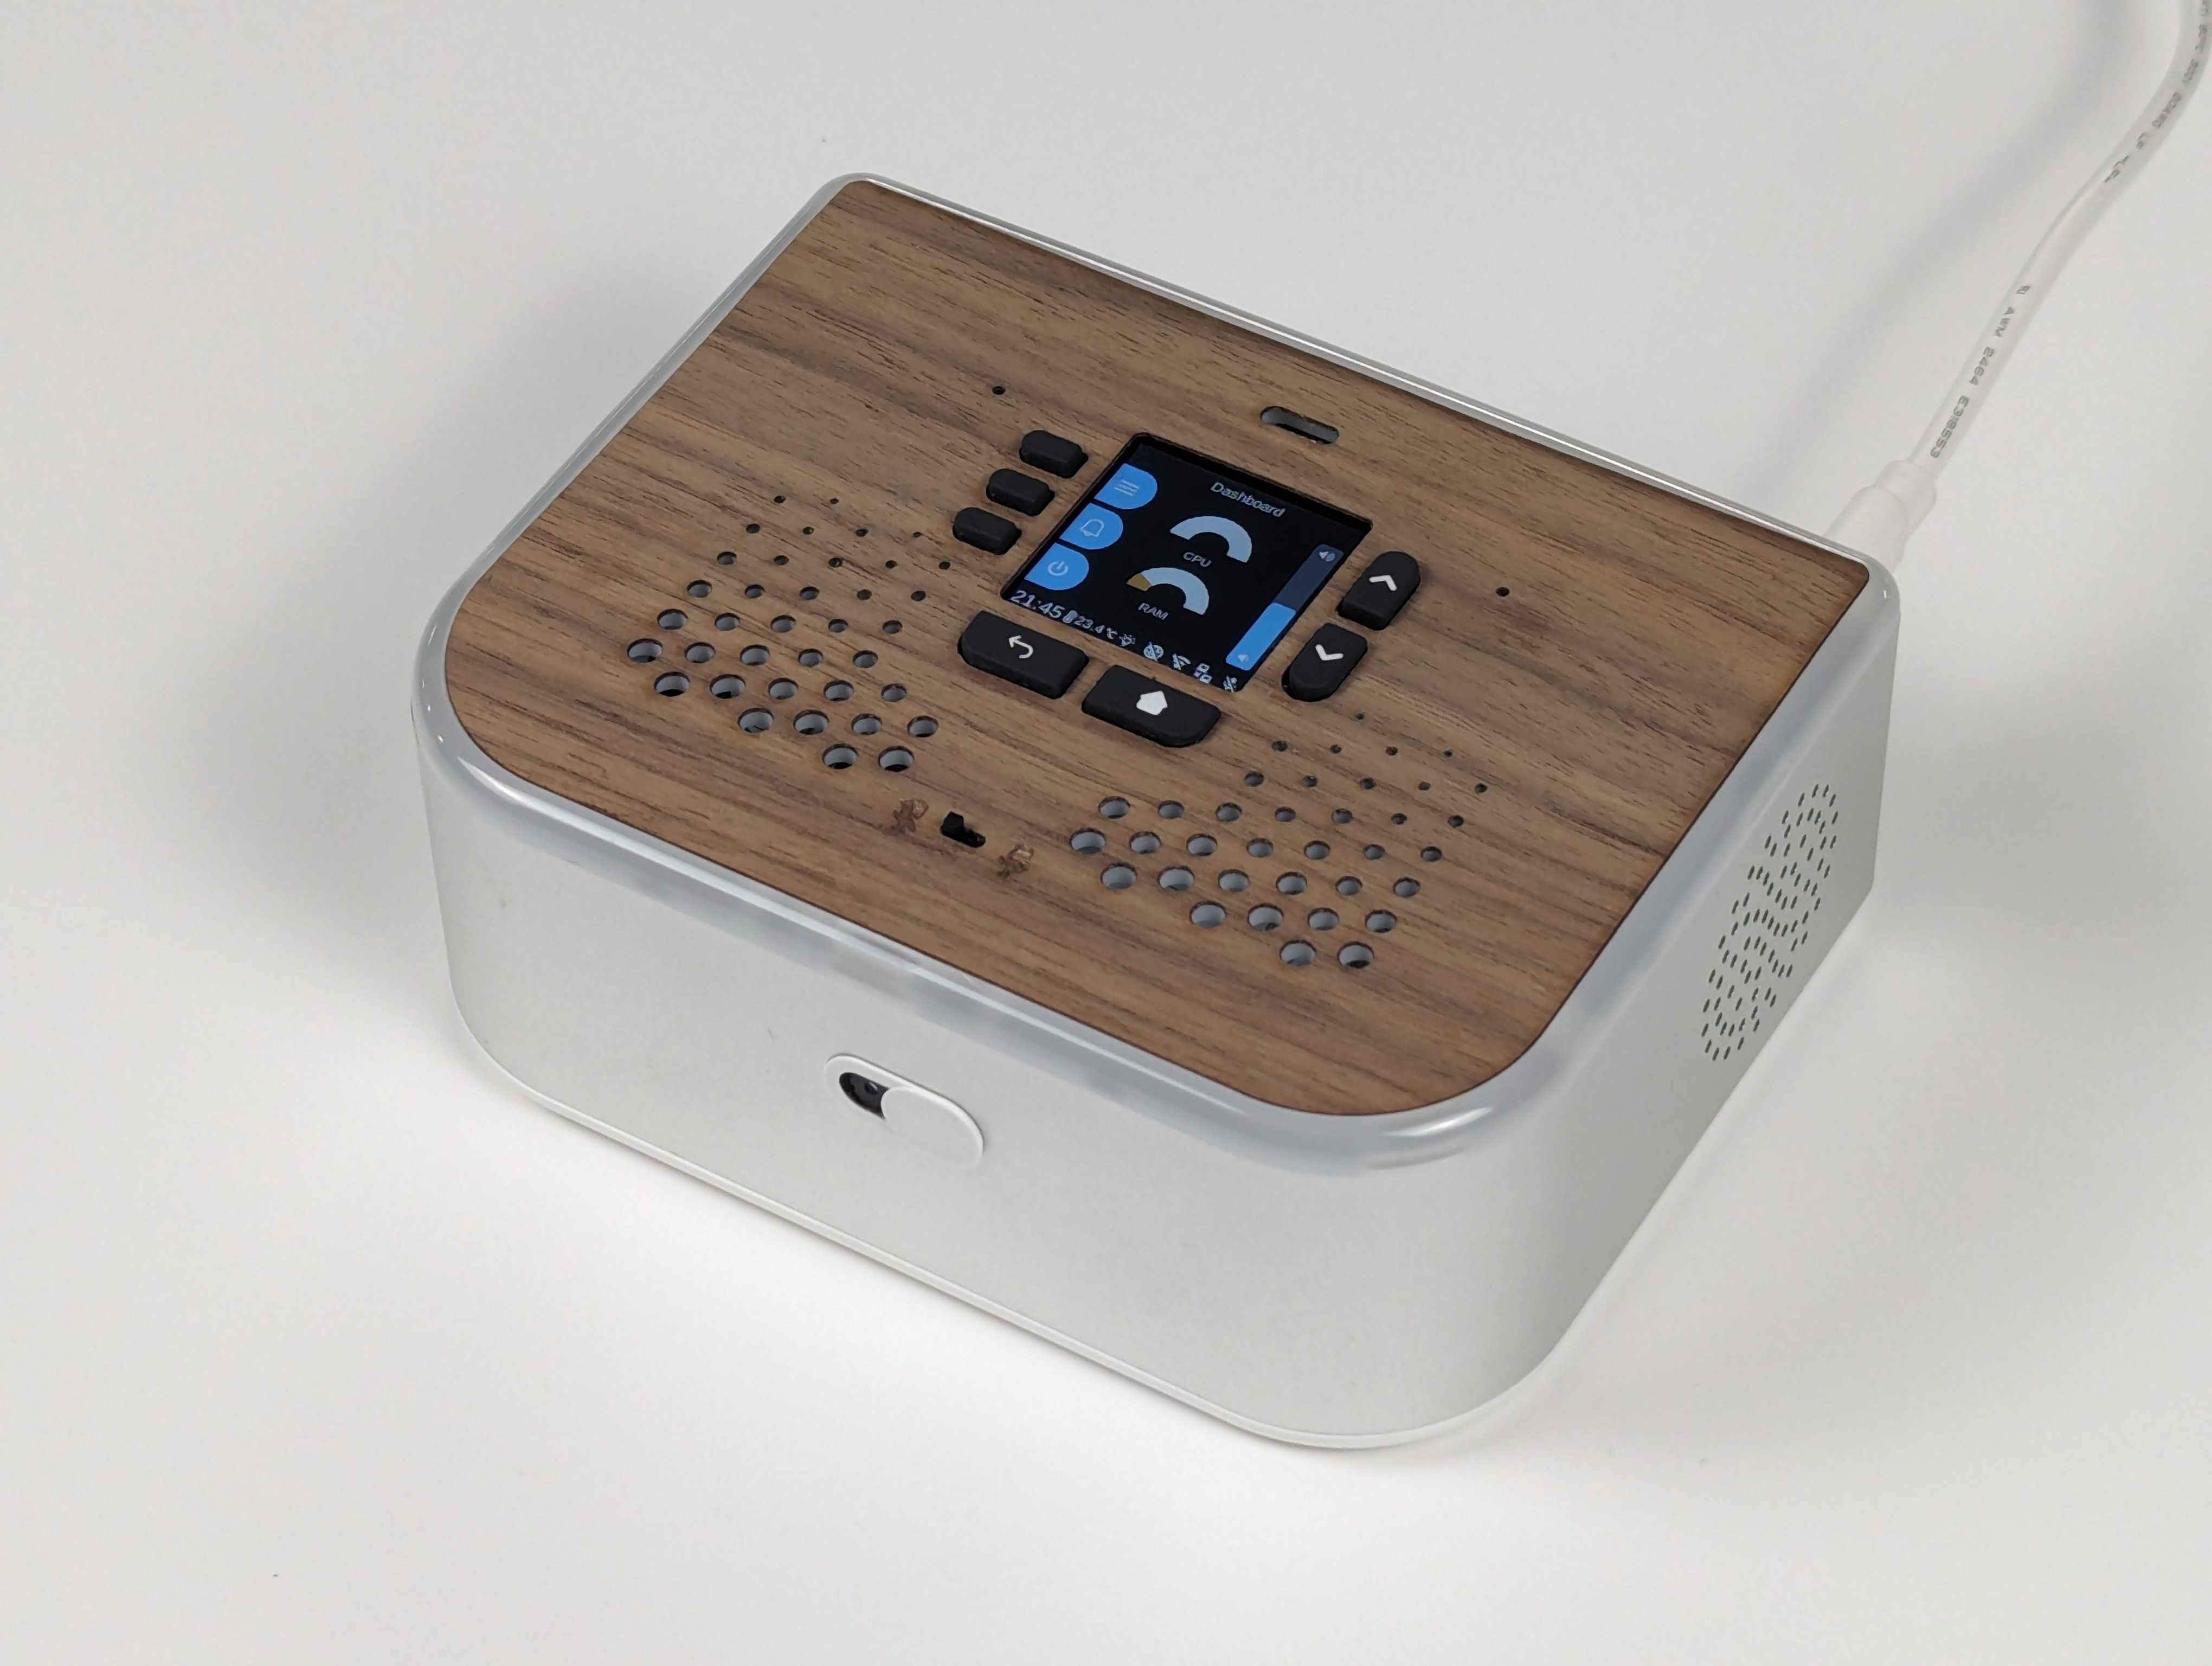 Example screenshots:
 ## 🚧 Disclaimer
Be aware that at the moment, Ubo app sends crash reports to Sentry. Soon we will
limit this to beta versions only.
## ⚙️ Notable Features
- Headless WiFi on-boarding with QR code
- Easy headless remote access with SSH and VS Code tunnel
- Install and run Docker apps headlessly
- Access and control basic RPi utilities and settings
## 📋 Requirements
Ubo app is developed to run on Raspberry Pi 4 and 5. The experience is optimized around Ubo Pod which offers
- a minimal LCD display and GUI with a keypad
- stereo microphone and speakers,
- camera
- LED ring
- sensors
The app functions even if some of these hardware elements are not provided, however some of the features that rely on these hardware components may not function. For example, WiFi onboarding with QR code requires a camera onboard.
## 📦 Installation
### Pre-packaged image
Ubo Pod ships with a pre-flashed MicroSD card that has the app installed on it by default.
If you don't have it, or you just want to set up a fresh device, then:
1. download one of the images from the release section
2. Use Raspberry Pi Images and choose `custom image` to provide the download image file.
3. Write to the image
4. Use the image to boot your Ubo Pod or Raspberry Pi
This is the fastest, easiest, and recommended way to get started with Ubo App.
### Install on existing OS
If you want to install the image on an existing operating system, then read on. Otherwise, skip this section.
---
⚠️ **Executing scripts directly from the internet with root privileges poses a significant
security risk. It's generally a good practice to ensure you understand the script's
content before running it. You can check the content of this particular script
[here](https://raw.githubusercontent.com/ubopod/ubo-app/main/ubo_app/system/install.sh)
before running it.**
---
To install ubo, run this command in a terminal shell:
```bash
curl -sSL https://raw.githubusercontent.com/ubopod/ubo-app/main/ubo_app/system/install.sh\
| sudo bash
```
If you want to install docker service and configure ubo to be able to use it run this:
```bash
curl -sSL https://raw.githubusercontent.com/ubopod/ubo-app/main/ubo_app/system/install.sh\
| sudo WITH_DOCKER=true bash
```
To allow the installer to install the latest alpha version of ubo run this:
```bash
curl -sSL https://raw.githubusercontent.com/ubopod/ubo-app/main/ubo_app/system/install.sh\
| sudo ALPHA=true bash
# or
curl -sSL https://raw.githubusercontent.com/ubopod/ubo-app/main/ubo_app/system/install.sh\
| sudo ALPHA=true WITH_DOCKER=true bash
```
Note that as part of the installation process, these debian packages are installed:
- git
- i2c-tools
- libcap-dev
- libegl1
- libgl1
- libmtdev1
- libzbar0
- python3-alsaaudio
- python3-dev
- python3-gpiozero
- python3-libcamera
- python3-picamera2
- python3-pip
- python3-pyaudio
- python3-virtualenv
Also be aware that ubo-app only installs in `/opt/ubo` and it is not customizable
at the moment.
## 🤝 Contributing
Contributions following Python best practices are welcome.
### ℹ️️ Conventions
- Use `UBO_` prefix for environment variables.
- Use `ubo:` prefix for notification ids used in ubo core and `:` prefix
for notification ids used in services.
- Use `ubo:` prefix for icon ids used in ubo core and `:` prefix for
icon ids used in services.
### Development
#### Setting up the development environment
To set up the development environment, you need to have Python 3.11+ and [`poetry`](https://python-poetry.org) installed.
First, clone the repository, then install the dependencies:
```bash
poetry install --with dev --extras=dev
```
Now you can run the app with:
```bash
poetry run ubo
```
#### Running tests
Easiest way to run tests is to use the provided `Dockerfile`s. To run the tests
in a container, you first need to create the development images by running:
```bash
poetry run poe build-docker-images
```
Then you can run the tests with:
```bash
docker run --rm -it --name ubo-app-test -v .:/ubo-app -v ubo-app-dev-pypoetry-cache:/root/.cache/pypoetry ubo-app-test
```
You can add arguments to the `pytest` command to run specific tests like this:
```bash
docker run --rm -it --name ubo-app-test -v .:/ubo-app -v ubo-app-dev-pypoetry-cache:/root/.cache/pypoetry ubo-app-test --
```
For example, to run only the tests in the `tests/test_app.py` file, you can run:
```bash
docker run --rm -it --name ubo-app-test -v .:/ubo-app -v ubo-app-dev-pypoetry-cache:/root/.cache/pypoetry ubo-app-test -- -n3 tests/test_some_test.py
```
You can also run the tests in your local environment by running:
```bash
poetry run poe test
```
⚠️**Note:** When running the tests in your local environment, the window snapshots produced by tests may mismatch the expected snapshots. This is because the snapshots are taken with a certain DPI and some environments may have different DPI settings. For example, we are aware that the snapshots taken in macOS have different DPI settings. If you encounter this issue, you should run the tests in a Docker container as described above.
#### QR code
In development environment, the camera is probably not working as it is relying, on `picamera2`, so it may become challenging to test the flows relying on QR code input.
To address this, the `qrcode_input` method, in not-RPi environments, will try to get its input from `/tmp/qrcode_input.txt`. So, whenever you encounter a QR code input, you can write the content of the QR code in that file and the application will read it from there and continue the flow.
## 🔒 License
This project is released under the Apache-2.0 License. See the [LICENSE](./LICENSE) file for more details.
## 🚧 Disclaimer
Be aware that at the moment, Ubo app sends crash reports to Sentry. Soon we will
limit this to beta versions only.
## ⚙️ Notable Features
- Headless WiFi on-boarding with QR code
- Easy headless remote access with SSH and VS Code tunnel
- Install and run Docker apps headlessly
- Access and control basic RPi utilities and settings
## 📋 Requirements
Ubo app is developed to run on Raspberry Pi 4 and 5. The experience is optimized around Ubo Pod which offers
- a minimal LCD display and GUI with a keypad
- stereo microphone and speakers,
- camera
- LED ring
- sensors
The app functions even if some of these hardware elements are not provided, however some of the features that rely on these hardware components may not function. For example, WiFi onboarding with QR code requires a camera onboard.
## 📦 Installation
### Pre-packaged image
Ubo Pod ships with a pre-flashed MicroSD card that has the app installed on it by default.
If you don't have it, or you just want to set up a fresh device, then:
1. download one of the images from the release section
2. Use Raspberry Pi Images and choose `custom image` to provide the download image file.
3. Write to the image
4. Use the image to boot your Ubo Pod or Raspberry Pi
This is the fastest, easiest, and recommended way to get started with Ubo App.
### Install on existing OS
If you want to install the image on an existing operating system, then read on. Otherwise, skip this section.
---
⚠️ **Executing scripts directly from the internet with root privileges poses a significant
security risk. It's generally a good practice to ensure you understand the script's
content before running it. You can check the content of this particular script
[here](https://raw.githubusercontent.com/ubopod/ubo-app/main/ubo_app/system/install.sh)
before running it.**
---
To install ubo, run this command in a terminal shell:
```bash
curl -sSL https://raw.githubusercontent.com/ubopod/ubo-app/main/ubo_app/system/install.sh\
| sudo bash
```
If you want to install docker service and configure ubo to be able to use it run this:
```bash
curl -sSL https://raw.githubusercontent.com/ubopod/ubo-app/main/ubo_app/system/install.sh\
| sudo WITH_DOCKER=true bash
```
To allow the installer to install the latest alpha version of ubo run this:
```bash
curl -sSL https://raw.githubusercontent.com/ubopod/ubo-app/main/ubo_app/system/install.sh\
| sudo ALPHA=true bash
# or
curl -sSL https://raw.githubusercontent.com/ubopod/ubo-app/main/ubo_app/system/install.sh\
| sudo ALPHA=true WITH_DOCKER=true bash
```
Note that as part of the installation process, these debian packages are installed:
- git
- i2c-tools
- libcap-dev
- libegl1
- libgl1
- libmtdev1
- libzbar0
- python3-alsaaudio
- python3-dev
- python3-gpiozero
- python3-libcamera
- python3-picamera2
- python3-pip
- python3-pyaudio
- python3-virtualenv
Also be aware that ubo-app only installs in `/opt/ubo` and it is not customizable
at the moment.
## 🤝 Contributing
Contributions following Python best practices are welcome.
### ℹ️️ Conventions
- Use `UBO_` prefix for environment variables.
- Use `ubo:` prefix for notification ids used in ubo core and `:` prefix
for notification ids used in services.
- Use `ubo:` prefix for icon ids used in ubo core and `:` prefix for
icon ids used in services.
### Development
#### Setting up the development environment
To set up the development environment, you need to have Python 3.11+ and [`poetry`](https://python-poetry.org) installed.
First, clone the repository, then install the dependencies:
```bash
poetry install --with dev --extras=dev
```
Now you can run the app with:
```bash
poetry run ubo
```
#### Running tests
Easiest way to run tests is to use the provided `Dockerfile`s. To run the tests
in a container, you first need to create the development images by running:
```bash
poetry run poe build-docker-images
```
Then you can run the tests with:
```bash
docker run --rm -it --name ubo-app-test -v .:/ubo-app -v ubo-app-dev-pypoetry-cache:/root/.cache/pypoetry ubo-app-test
```
You can add arguments to the `pytest` command to run specific tests like this:
```bash
docker run --rm -it --name ubo-app-test -v .:/ubo-app -v ubo-app-dev-pypoetry-cache:/root/.cache/pypoetry ubo-app-test --
```
For example, to run only the tests in the `tests/test_app.py` file, you can run:
```bash
docker run --rm -it --name ubo-app-test -v .:/ubo-app -v ubo-app-dev-pypoetry-cache:/root/.cache/pypoetry ubo-app-test -- -n3 tests/test_some_test.py
```
You can also run the tests in your local environment by running:
```bash
poetry run poe test
```
⚠️**Note:** When running the tests in your local environment, the window snapshots produced by tests may mismatch the expected snapshots. This is because the snapshots are taken with a certain DPI and some environments may have different DPI settings. For example, we are aware that the snapshots taken in macOS have different DPI settings. If you encounter this issue, you should run the tests in a Docker container as described above.
#### QR code
In development environment, the camera is probably not working as it is relying, on `picamera2`, so it may become challenging to test the flows relying on QR code input.
To address this, the `qrcode_input` method, in not-RPi environments, will try to get its input from `/tmp/qrcode_input.txt`. So, whenever you encounter a QR code input, you can write the content of the QR code in that file and the application will read it from there and continue the flow.
## 🔒 License
This project is released under the Apache-2.0 License. See the [LICENSE](./LICENSE) file for more details.