## ✅ TODO List
- [x] **ZEB**: **Z**ero-shot **E**valuation **B**enchmark
- [x] Video Preprocess Code
- [x] 3D Reconstruction
- [x] Models
- [x] gim_roma
- [x] gim_dkm
- [x] gim_loftr
- [x] gim_lightglue
- [x] Training code
- [x] gim_roma
- [x] gim_dkm
- [x] gim_loftr
- [x] gim_lightglue
## 🤗 Online demo
Go to [Huggingface](https://huggingface.co/spaces/xuelunshen/gim-online) to quickly try our model online.
## ⚙️ Environment
Use the following command to create the environment
```bash
conda create -f environment.yaml
conda activate gim
```
## 🔨 How to Use the `GIM` Series Matching Network
1. Clone the repository
```bash
git clone https://github.com/xuelunshen/gim.git
cd gim
```
2. Download `gim_roma` model weight from [Google Drive](https://drive.google.com/file/d/1OGNbJdw9zn5zHC4WNQ0IMqdGCS0HMUfe/view?usp=sharing) or [OneDrive](https://stuxmueducn-my.sharepoint.com/:u:/g/personal/xuelun_stu_xmu_edu_cn/EYaa2YFWyLlIsegtq3eM1EkBqw4AH0yy2f2ZRdhADXKWtg?e=VVab9g), download `gim_dkm` model weight from [Google Drive](https://drive.google.com/file/d/1gk97V4IROnR1Nprq10W9NCFUv2mxXR_-/view?usp=sharing) or [OneDrive](https://stuxmueducn-my.sharepoint.com/:u:/g/personal/xuelun_stu_xmu_edu_cn/EdJOibZ8VABOoKoyOHWo8ZEBHd_MyHbSvhRyT_o40SIPGA?e=GCjGZE)
3. Put it on the folder `weights`
4. Run the following commands
[ Click to show commands ]
```bash
python demo.py --model gim_roma
# or
python demo.py --model gim_dkm
# or
python demo.py --model gim_loftr
# or
python demo.py --model gim_lightglue
```
5. The code will match `a1.png` and `a2.png` in the folder `assets/demo`,and output `a1_a2_match.png` and `a1_a2_warp.png`.
[ Click to show
a1.png
and
a2.png ]
[ Click to show
a1_a2_match.png ]
a1_a2_match.png is a visualization of the match between the two images
[ Click to show
a1_a2_warp.png ]
a1_a2_warp.png shows the effect of projecting image a2 onto image a1 using homography
There are more images in the `assets/demo` folder, you can try them out.
[ Click to show other images ]
## 🎞️ Video Preprocess
### Get reliable pixel correspondences between video frames without 3D reconstruction
> Because of some reasons, we cannot provide specific YouTube videos used for training, but I can tell you that using the keywords `walk in` or `walk through` to search on YouTube will find relevant videos. The videos used for processing need to be shot without any processing. There should be no editing, no transitions, no special effects, etc. Below, I will introduce the entire process.
> Preparation:
> 1. download the [semantic-segmentation](https://github.com/CSAILVision/semantic-segmentation-pytorch)'s model parameters (`decoder_epoch_20.pth`) from [Google Drive](https://drive.google.com/file/d/1YswCj58VuVhqEpMKQ_k0QJb3_mMdpF8M/view?usp=sharing) or [OneDrive](https://stuxmueducn-my.sharepoint.com/:u:/g/personal/xuelun_stu_xmu_edu_cn/EUR_XMay5b5FtWelmqXiLi4Bcnv4G1w5b2aYjhqS-Ds_ow) and put the model parameters in the folder `weights`.
> 2. Install `yt-dlp` (on Ubuntu system, use `sudo apt-get install yt-dlp` to install)
1. Put the id of the YouTube video you want to process into the `video_list.txt` file. For example, the id of the video `https://www.youtube.com/watch?v=Od-rKbC30TM` is `Od-rKbC30TM`. Now the `video_list.txt` file already contains this example video. You can do nothing now and directly go to the second step.
2. Use the command `chmod +x process_videos.sh` to give the `process_videos.sh` file execution permission
3. Use the command `./process_videos.sh video_list.txt` to run the video processing code
4. Use the command `python -m datasets.walk.propagate video_list.txt` to run the matching label propagation code
5. Use the command `python -m datasets.walk.walk video_list.txt` to run the visualization code
> The processing results and intermediate files are located in the `data/ZeroMatch` folder, and the visualization results are in the `dump/walk` folder. If everything goes well, you should see a result similar to the image below (click to expand the image).
[ Click to show visualization results ]
[ ⚠️ If you encounter VideoReader errors from torchvision, click to expand ]
Create a new conda environment and install the dependencies below, then run the video processing code.
```bash
conda create -n gim-video python=3.8.10
conda install pytorch==1.10.1 torchvision==0.11.2 torchaudio==0.10.1 cudatoolkit=11.3 -c pytorch -c conda-forge
pip install albumentations==1.0.1 --no-binary=imgaug,albumentations
pip install pytorch-lightning==1.5.10
pip install opencv-python==4.5.3.56
pip install imagesize==1.2.0
pip install kornia==0.6.10
pip install einops==0.3.0
pip install loguru==0.5.3
pip install joblib==1.0.1
pip install yacs==0.1.8
pip install h5py==3.1.0
```
## 🏋️ Training Network
> After processing the video, it's time to train the network. The training code is in the `train-gim-roma`, `train-gim-dkm`, `train-gim-loftr` and `train-gim-glue` branch of the repository.
1. Use the command `git checkout train-gim-loftr` to switch to the `train-gim-loftr` branch
2. Use the command below to run the training code
```bash
#! /bin/bash
GPUS=8
NNODES=5
GITID=$(git rev-parse --short=8 HEAD)
MODELID=$(cat /dev/urandom | tr -dc 'a-z0-9' | fold -w 8 | head -n 1)
python -m torch.distributed.launch --nproc_per_node=gpu --nnodes=$WORLD_SIZE --node_rank $RANK --master_addr $MASTER_ADDR --master_port $MASTER_PORT --use_env train.py --num_nodes $NNODES --gpus $GPUS --max_epochs 10 --maxlen 938240 938240 938240 --lr 0.001 --min_lr 0.00005 --git $GITID --wid $MODELID --resample --img_size 840 --batch_size 1 --valid_batch_size 2
```
We train `gim-loftr` on 5 A100 nodes, with each node having 8 GPUs with 80 GB memory. The parameters `WORLD_SIZE`, `RANK`, `MASTER_ADDR`, `MASTER_PORT` are for distributed training and should be automatically obtained from the cluster environment. If you are using single machine with single GPU or multiple GPUs, you can run the training code with the command below.
```bash
python train.py --num_nodes 1 --gpus $GPUS --max_epochs 10 --maxlen 938240 938240 938240 --lr 0.001 --min_lr 0.00005 --git $GITID --wid $MODELID --resample --img_size 840 --batch_size 1 --valid_batch_size 2
```
The training commands for other models are as follows:
```bash
# gim-roma
python train.py --num_nodes 1 --gpus $GPUS --max_epochs 370 --maxlen 25600 25600 25600 --lr 0.0008 --min_lr 0.0001 --git $GITID --wid $MODELID --resample --img_size 672 --batch_size 1 --valid_batch_size 2
# gim-dkm
python train.py --num_nodes 1 --gpus $GPUS --max_epochs 10 --maxlen 938240 938240 938240 --lr 0.0008 --min_lr 0.0001 --git $GITID --wid $MODELID --resample --img_size 896 672 --batch_size 1 --valid_batch_size 2
# gim-lightglue
python train.py --num_nodes 1 --gpus $GPUS --max_epochs 50 --maxlen 938240 938240 938240 --lr 0.0001 --git $GITID --wid $MODELID --resample --img_size 1024 --batch_size 1 --valid_batch_size 2
```
## 🕋 3D Reconstruction
The code for 3D reconstruction in this repository is implemented based on [hloc](https://github.com/cvg/Hierarchical-Localization).
First, install [colmap](https://colmap.github.io/) and [pycolmap](https://github.com/colmap/pycolmap) according to hloc's README.
Then, download the [semantic-segmentation](https://github.com/CSAILVision/semantic-segmentation-pytorch)'s model parameters (`decoder_epoch_20.pth`) from [Google Drive](https://drive.google.com/file/d/1YswCj58VuVhqEpMKQ_k0QJb3_mMdpF8M/view?usp=sharing) or [OneDrive](https://stuxmueducn-my.sharepoint.com/:u:/g/personal/xuelun_stu_xmu_edu_cn/EUR_XMay5b5FtWelmqXiLi4Bcnv4G1w5b2aYjhqS-Ds_ow) and put the model parameters in the folder `weights`.
Next, create some folders. If you want to reconstruct a room in 3D, run the following command:
```bash
mkdir -p inputs/room/images
```
Then, put images of the room to be reconstructed in 3D into the `images` folder.
Finally, run the following command to perform a 3D reconstruction:
```bash
sh reconstruction.sh room gim_dkm
# or
sh reconstruction.sh room gim_lightglue
```
> Tips:\
> At present, the code for 3D reconstruction defaults to pairing all images pairwise, and then performing image matching and reconstruction,\
> For better reconstruction results, it is recommended to modify the code according to the actual situation and adjust the paired images.
## 📊 ZEB: Zero-shot Evaluation Benchmark
1. Create a folder named **`zeb`**.
2. Download zip archives containing the **ZEB** data from [the URL](https://stuxmueducn-my.sharepoint.com/:f:/g/personal/lizijun_stu_xmu_edu_cn/EmHLjQpbpDRKmiED88rxGl4BFIkSp7vAzXifwXtvVbQA9w?e=ey8WVk), put it into the **`zeb`** folder and unzip zip archives.
3. Run the following commands
[ Click to show commands ]
The number **1** below represents the number of GPUs you want to use. If you want to use **2 GPUs**, change the number **1** to **2**.
```bash
sh TEST_GIM_ROMA.sh 1
# or
sh TEST_GIM_DKM.sh 1
# or
sh TEST_GIM_LOFTR.sh 1
# or
sh TEST_GIM_LIGHTGLUE.sh 1
# or
sh TEST_ROOT_SIFT.sh 1
```
4. Run the command `python check.py` to check if everything outputs `"Good"`.
5. Run the command `python analysis.py --dir dump/zeb --wid gim_dkm --version 100h --verbose` to get result.
6. Paste the **ZEB** result to the Excel file named `zeb.xlsx`.
[ Click to show 📊 ZEB Result ]
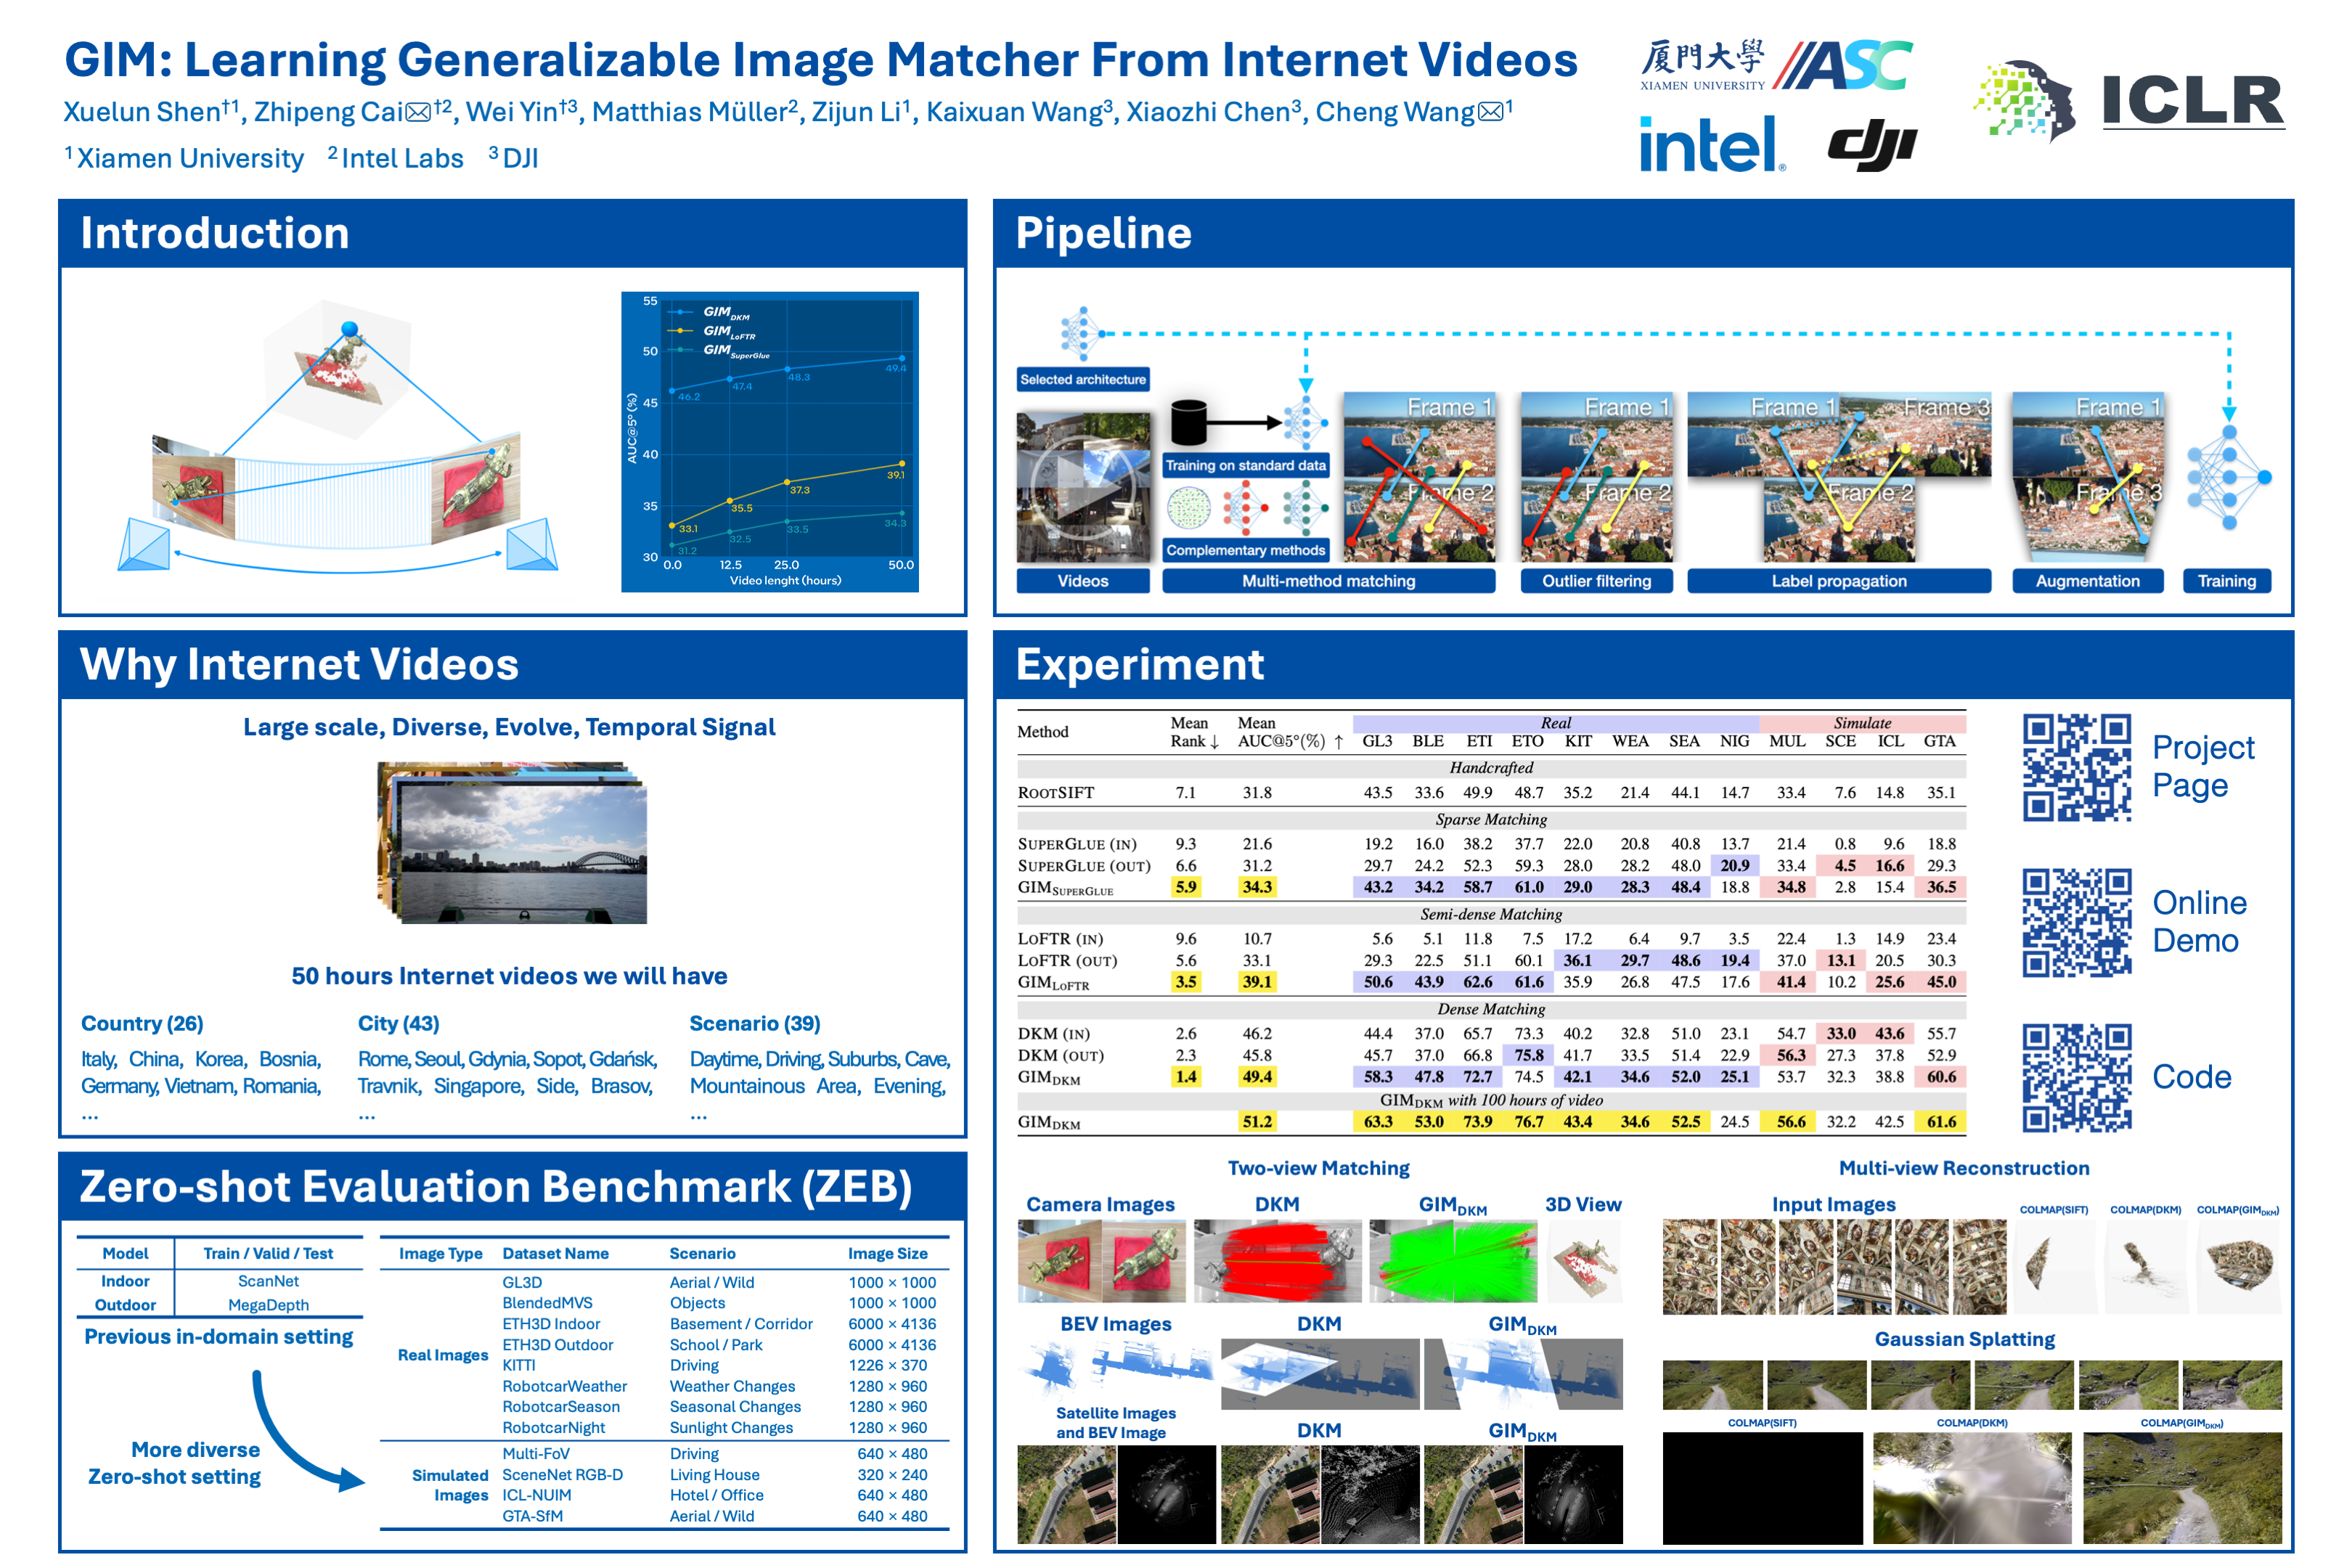
> The data in this table comes from the **ZEB**: Zero-shot Evaluation Benchmark for Image Matching proposed in the paper. This benchmark consists of 12 public datasets that cover a variety of scenes, weather conditions, and camera models, corresponding to the 12 test sequences starting from GL3 in the table.
| |
## 📌 Citation
If the paper and code from `gim` help your research, we kindly ask you to give a citation to our paper ❤️. Additionally, if you appreciate our work and find this repository useful, giving it a star ⭐️ would be a wonderful way to support our work. Thank you very much.
```bibtex
@inproceedings{
xuelun2024gim,
title={GIM: Learning Generalizable Image Matcher From Internet Videos},
author={Xuelun Shen and Zhipeng Cai and Wei Yin and Matthias Müller and Zijun Li and Kaixuan Wang and Xiaozhi Chen and Cheng Wang},
booktitle={The Twelfth International Conference on Learning Representations},
year={2024}
}
```
## 🌟 Star History
## License
This repository is under the MIT License. This content/model is provided here for research purposes only. Any use beyond this is your sole responsibility and subject to your securing the necessary rights for your purpose.