# DeepFly3D
**Repository Path**: aHeiDaBai/DeepFly3D
## Basic Information
- **Project Name**: DeepFly3D
- **Description**: No description available
- **Primary Language**: Unknown
- **License**: LGPL-3.0
- **Default Branch**: master
- **Homepage**: None
- **GVP Project**: No
## Statistics
- **Stars**: 0
- **Forks**: 0
- **Created**: 2025-10-22
- **Last Updated**: 2025-10-30
## Categories & Tags
**Categories**: Uncategorized
**Tags**: None
## README
# Markerless Multi-view Motion Capture for Tethered Drosophila
 [](https://www.gnu.org/licenses/gpl-3.0)
[](https://badge.fury.io/py/nely-df3d)

DeepFly3D is a PyTorch and PyQT5 implementation of 2D-3D tethered Drosophila pose estimation. It aims to provide an interface for pose estimation and to permit further correction of 2D pose estimates, which are automatically converted to 3D pose.
DeepFly3D does not require a calibration pattern, it enforces geometric constraints using pictorial structures, which corrects most of the errors, and the remaining errors are automatically detected can be dealt manually with GUI.
We previously published our DeepFly3D work on eLife journal. You can read the publication [here](https://elifesciences.org/articles/48571).
# Table of Contents
- [Markerless Multi-view Motion Capture for Tethered Drosophila](#markerless-multi-view-motion-capture-for-tethered-drosophila)
- [Table of Contents](#table-of-contents)
- [Installing](#installing)
- [Installing with pip](#installing-with-pip)
- [Odd CUDA Drivers](#odd-cuda-drivers)
- [Installing from the source](#installing-from-the-source)
- [Installing from the source for development](#installing-from-the-source-for-development)
- [Data Structure](#data-structure)
- [Basic Usage](#basic-usage)
- [Advanced Usage](#advanced-usage)
- [Python Interface](#python-interface)
- [Videos](#videos)
- [Output](#output)
- [Points2D](#points2d)
- [Points3D](#points3d)
- [Camera Ordering](#camera-ordering)
- [Heatmap Confidence](#heatmap-confidence)
- [Calibration](#calibration)
- [Running GUI](#running-gui)
- [Development](#development)
- [Releasing a new version](#releasing-a-new-version)
- [References](#references)
- [Version History](#version-history)
- [Changes in 0.5](#changes-in-05)
- [Changes in 0.4](#changes-in-04)
- [Changes in 0.3](#changes-in-03)
- [Changes in 0.2](#changes-in-02)
- [Extras:](#extras)
# Installing
## Installing with pip
Create a new anaconda environment, and pip install nely-df3d package.
```bash
conda create -n df3d python=3.12
conda activate df3d
pip install nely-df3d
```
## Odd CUDA Drivers
**Only in case your cuda driver is not up-to-date**, or is not supported by mainstream pytorch, additionally you might need to explicitly install cudatoolkit before pip installing nely-df3d:
```bash
conda install pytorch torchvision torchaudio cudatoolkit="YOUR_CUDA_VERSION" -c pytorch
```
For example with with RTX 3080 Ti GPU, you will need to do:
```bash
conda create -n df3d python=3.12
conda activate df3d
conda install pytorch torchvision cudatoolkit=11 -c pytorch-nightly
pip install nely-df3d
```
## Installing from the source
DeepFly3D requires Python3, Anaconda environment and CUDA drivers for installation. It is __only tested on Ubuntu and MacOS__. First, clone the repository:
```
git clone https://github.com/NeLy-EPFL/DeepFly3D
cd DeepFly3D
```
Then, run create a conda environment with
```
conda create -n df3d python=3.12
```
which will create a new python environment. Then, activate the environment.
```
conda activate df3d
```
Once this is done you can install the **df3d** package with the following command,
```
pip install -e .
```
which uses the setup.py function to create the package.
Make sure you also have installed the CUDA drivers compatible with your GPU, otherwise it is not possible to make 2D predictions. You can check how to install CUDA drivers here: https://developer.nvidia.com/cuda-downloads
## Installing from the source for development
To run DeepFly3D you also need 2 other packages, `nely-df2d` and `nely-pyba`. If you want to do development it's best to install all 3 from source so you can easily make changes to different parts of the code. You can do that as follows.
```bash
# in a particular folder, clone all 3 repos
git clone https://github.com/NeLy-EPFL/DeepFly3D.git
git clone https://github.com/NeLy-EPFL/DeepFly2D.git
git clone https://github.com/NeLy-EPFL/PyBundleAdjustment.git
cd DeepFly3D
conda env create -n df3d python=3.12
conda activate df3d
# this will install all 3 packages as editable
pip install -e ../DeepFly2D -e ../PyBundleAdjustment -e .
```
# Data Structure
The inteded usage of DeepFly3D is through command-line-intarface (CLI).
df3d-cli assumes there are videos or images in this format under the folder.
if your path /your/image/path has images or videos, df3d-cli will run 2D pose estimation, calibration and triangulation and will save 2d pose, 3d pose and calibration parameters under the folder /your/image/path/df3d.
Idealy you would have images or videos under ```images/``` folder, with the specific naming convention:
```
.
+-- images/
| +-- camera_0_img_0.jpg
| +-- camera_1_img_0.jpg
| +-- camera_2_img_0.jpg
| +-- camera_3_img_0.jpg
| +-- camera_4_img_0.jpg
| +-- camera_5_img_0.jpg
| +-- camera_6_img_0.jpg
...
```
or
```
.
+-- images
| +-- camera_0.mp4
| +-- camera_1.mp4
| +-- camera_2.mp4
| +-- camera_3.mp4
| +-- camera_4.mp4
| +-- camera_5.mp4
| +-- camera_6.mp4
```
In case of mp4 files, df3d will first expand them into images using ffmpeg. Please check the sample data for a real example: https://github.com/NeLy-EPFL/DeepFly3D/tree/master/sample/test
# Basic Usage
The basic usage is like this.
```bash
df3d-cli /your/image/path
```
This command assumes your cameras are numbered in the default order:
[](https://www.gnu.org/licenses/gpl-3.0)
[](https://badge.fury.io/py/nely-df3d)

DeepFly3D is a PyTorch and PyQT5 implementation of 2D-3D tethered Drosophila pose estimation. It aims to provide an interface for pose estimation and to permit further correction of 2D pose estimates, which are automatically converted to 3D pose.
DeepFly3D does not require a calibration pattern, it enforces geometric constraints using pictorial structures, which corrects most of the errors, and the remaining errors are automatically detected can be dealt manually with GUI.
We previously published our DeepFly3D work on eLife journal. You can read the publication [here](https://elifesciences.org/articles/48571).
# Table of Contents
- [Markerless Multi-view Motion Capture for Tethered Drosophila](#markerless-multi-view-motion-capture-for-tethered-drosophila)
- [Table of Contents](#table-of-contents)
- [Installing](#installing)
- [Installing with pip](#installing-with-pip)
- [Odd CUDA Drivers](#odd-cuda-drivers)
- [Installing from the source](#installing-from-the-source)
- [Installing from the source for development](#installing-from-the-source-for-development)
- [Data Structure](#data-structure)
- [Basic Usage](#basic-usage)
- [Advanced Usage](#advanced-usage)
- [Python Interface](#python-interface)
- [Videos](#videos)
- [Output](#output)
- [Points2D](#points2d)
- [Points3D](#points3d)
- [Camera Ordering](#camera-ordering)
- [Heatmap Confidence](#heatmap-confidence)
- [Calibration](#calibration)
- [Running GUI](#running-gui)
- [Development](#development)
- [Releasing a new version](#releasing-a-new-version)
- [References](#references)
- [Version History](#version-history)
- [Changes in 0.5](#changes-in-05)
- [Changes in 0.4](#changes-in-04)
- [Changes in 0.3](#changes-in-03)
- [Changes in 0.2](#changes-in-02)
- [Extras:](#extras)
# Installing
## Installing with pip
Create a new anaconda environment, and pip install nely-df3d package.
```bash
conda create -n df3d python=3.12
conda activate df3d
pip install nely-df3d
```
## Odd CUDA Drivers
**Only in case your cuda driver is not up-to-date**, or is not supported by mainstream pytorch, additionally you might need to explicitly install cudatoolkit before pip installing nely-df3d:
```bash
conda install pytorch torchvision torchaudio cudatoolkit="YOUR_CUDA_VERSION" -c pytorch
```
For example with with RTX 3080 Ti GPU, you will need to do:
```bash
conda create -n df3d python=3.12
conda activate df3d
conda install pytorch torchvision cudatoolkit=11 -c pytorch-nightly
pip install nely-df3d
```
## Installing from the source
DeepFly3D requires Python3, Anaconda environment and CUDA drivers for installation. It is __only tested on Ubuntu and MacOS__. First, clone the repository:
```
git clone https://github.com/NeLy-EPFL/DeepFly3D
cd DeepFly3D
```
Then, run create a conda environment with
```
conda create -n df3d python=3.12
```
which will create a new python environment. Then, activate the environment.
```
conda activate df3d
```
Once this is done you can install the **df3d** package with the following command,
```
pip install -e .
```
which uses the setup.py function to create the package.
Make sure you also have installed the CUDA drivers compatible with your GPU, otherwise it is not possible to make 2D predictions. You can check how to install CUDA drivers here: https://developer.nvidia.com/cuda-downloads
## Installing from the source for development
To run DeepFly3D you also need 2 other packages, `nely-df2d` and `nely-pyba`. If you want to do development it's best to install all 3 from source so you can easily make changes to different parts of the code. You can do that as follows.
```bash
# in a particular folder, clone all 3 repos
git clone https://github.com/NeLy-EPFL/DeepFly3D.git
git clone https://github.com/NeLy-EPFL/DeepFly2D.git
git clone https://github.com/NeLy-EPFL/PyBundleAdjustment.git
cd DeepFly3D
conda env create -n df3d python=3.12
conda activate df3d
# this will install all 3 packages as editable
pip install -e ../DeepFly2D -e ../PyBundleAdjustment -e .
```
# Data Structure
The inteded usage of DeepFly3D is through command-line-intarface (CLI).
df3d-cli assumes there are videos or images in this format under the folder.
if your path /your/image/path has images or videos, df3d-cli will run 2D pose estimation, calibration and triangulation and will save 2d pose, 3d pose and calibration parameters under the folder /your/image/path/df3d.
Idealy you would have images or videos under ```images/``` folder, with the specific naming convention:
```
.
+-- images/
| +-- camera_0_img_0.jpg
| +-- camera_1_img_0.jpg
| +-- camera_2_img_0.jpg
| +-- camera_3_img_0.jpg
| +-- camera_4_img_0.jpg
| +-- camera_5_img_0.jpg
| +-- camera_6_img_0.jpg
...
```
or
```
.
+-- images
| +-- camera_0.mp4
| +-- camera_1.mp4
| +-- camera_2.mp4
| +-- camera_3.mp4
| +-- camera_4.mp4
| +-- camera_5.mp4
| +-- camera_6.mp4
```
In case of mp4 files, df3d will first expand them into images using ffmpeg. Please check the sample data for a real example: https://github.com/NeLy-EPFL/DeepFly3D/tree/master/sample/test
# Basic Usage
The basic usage is like this.
```bash
df3d-cli /your/image/path
```
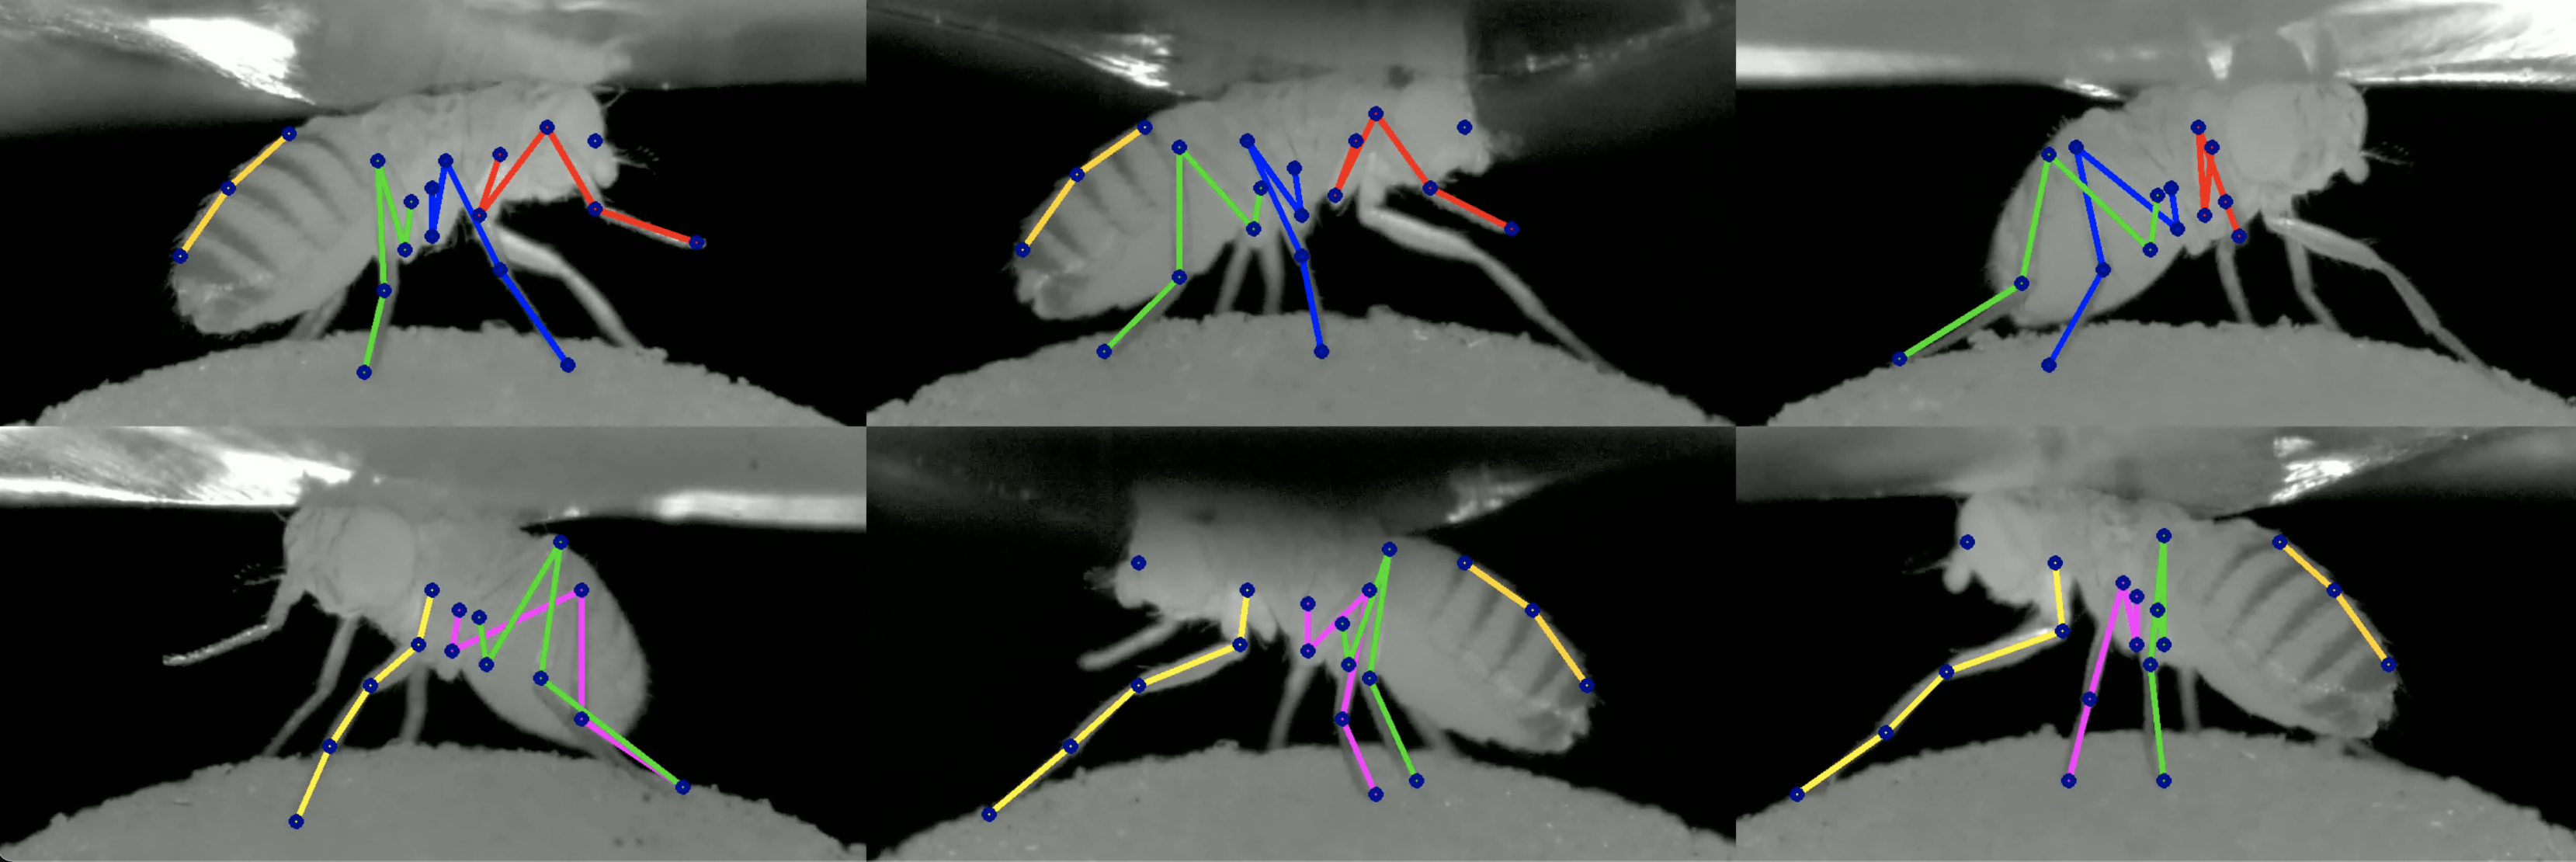
This command assumes your cameras are numbered in the default order:

in which case your data will look like this if cameras 0, 1, 2 are shown left-to-right in the top row and cameras 4, 5, 6 are show left-to-right in the bottom row:
If instead your camera order is reversed for instance:
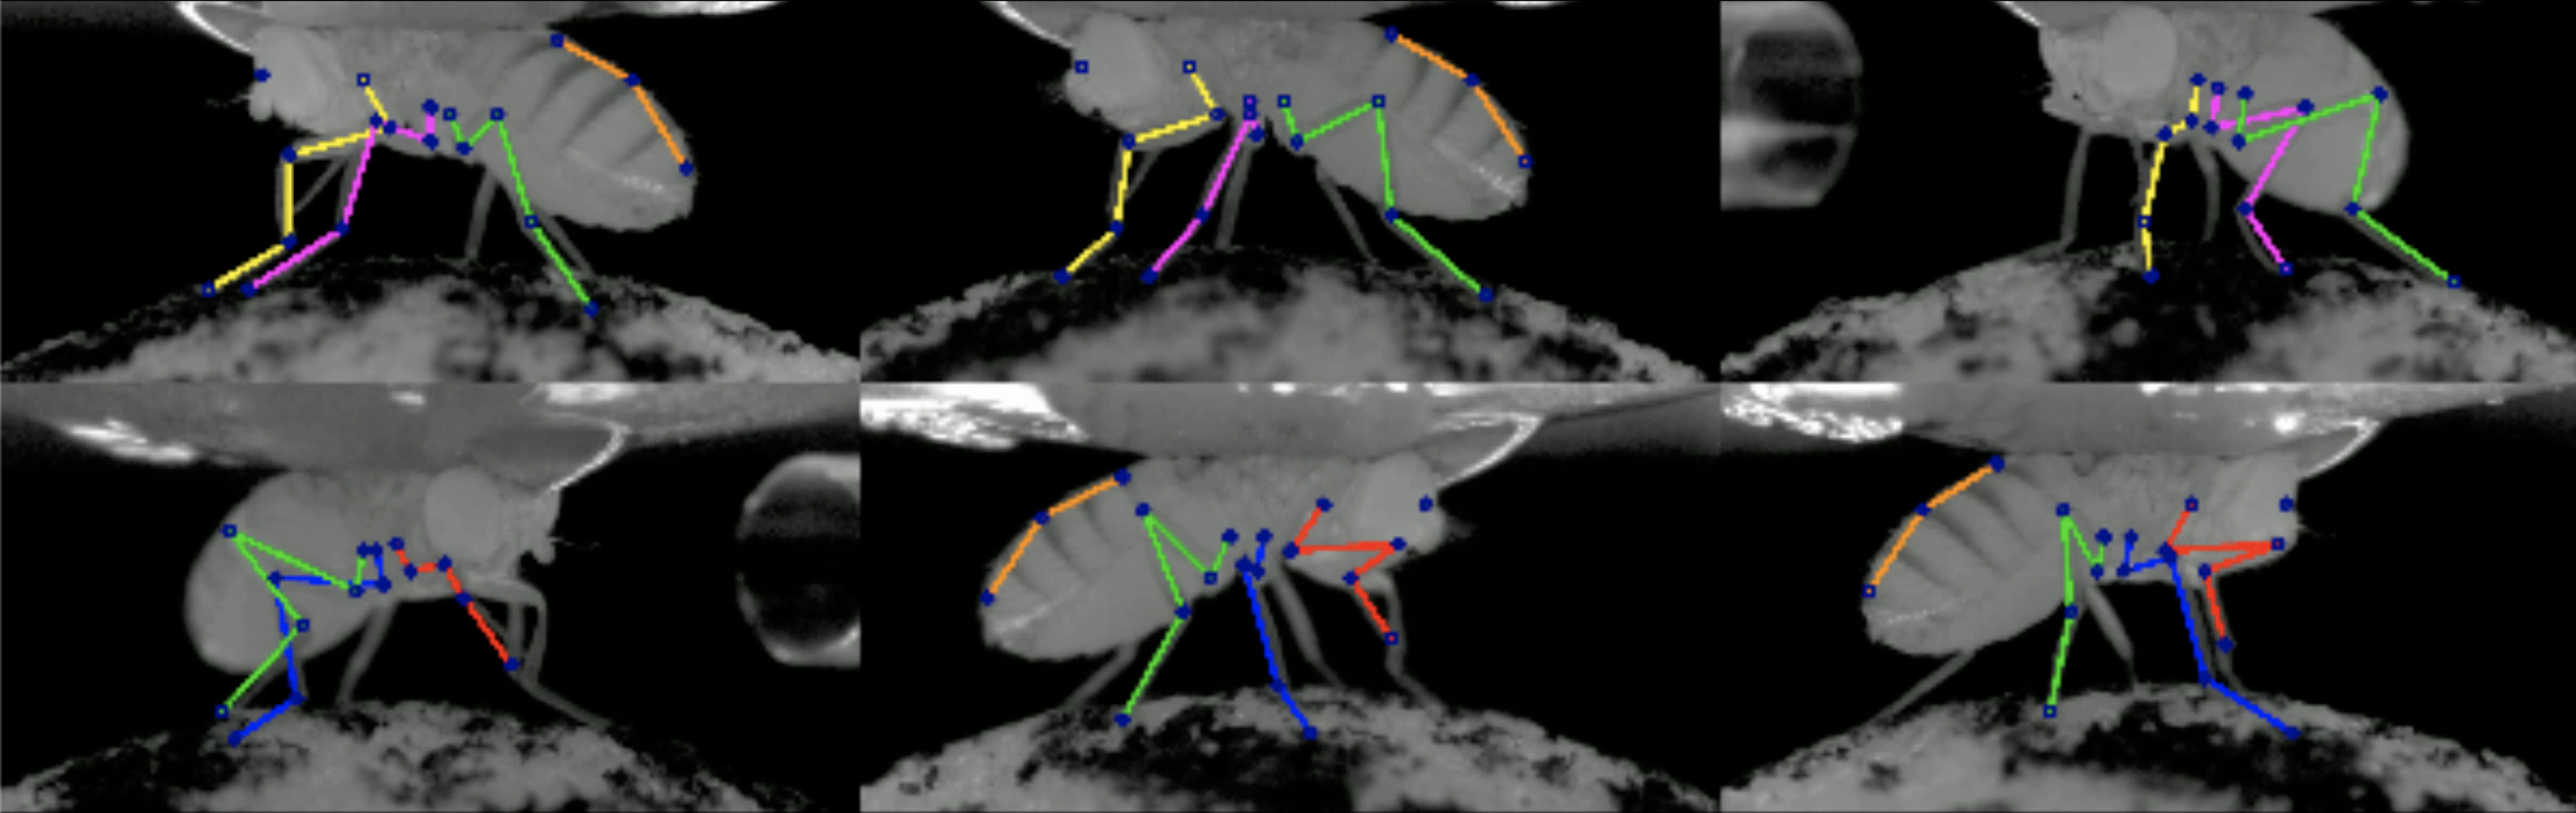
then your order is 6 5 4 3 2 1 0, so you'd need to run `df3d-cli /your/image/path --order 6 5 4 3 2 1 0` to get DeepFly3D to work properly.
# Advanced Usage
```
usage: df3d-cli [-h] [-v] [-vv] [-d] [--output-folder OUTPUT_FOLDER] [-r] [-f]
[-o] [-n NUM_IMAGES_MAX]
[--order [CAMERA_IDS [CAMERA_IDS ...]]] [--skip-pose-estimation]
[--video-2d] [--video-3d] [--output-fps OUTPUT_FPS]
[--batch-size BATCH_SIZE] [--pin-memory-disabled]
INPUT
DeepFly3D pose estimation
positional arguments:
INPUT Without additional arguments, a folder containing
unlabeled images.
optional arguments:
-h, --help show this help message and exit
-v, --verbose Enable info output (such as progress bars)
-vv, --verbose2 Enable debug output
-d, --debug Displays the argument list for debugging purposes
--output-folder OUTPUT_FOLDER
The name of subfolder where to write results
-r, --recursive INPUT is a folder. Successively use its subfolders
named 'images/'
-f, --from-file INPUT is a text-file, where each line names a folder.
Successively use the listed folders.
-o, --overwrite Rerun pose estimation and overwrite existing pose
results
-n NUM_IMAGES_MAX, --num-images-max NUM_IMAGES_MAX
Maximal number of images to process.
--order [CAMERA_IDS [CAMERA_IDS ...]]
Ordering of the cameras provided as an ordered list of
ids. Example: 0 1 4 3 2 5 6.
--skip-pose-estimation
Skip 2D and 3D pose estimation. Use in combination with --video-2d
or --video-3d to generate videos without rerunning pose estimation.
--video-2d Generate pose2d videos
--video-3d Generate pose3d videos
--output-fps OUTPUT_FPS
FPS for output videos. If not specified, uses the FPS from
the input videos.
--batch-size BATCH_SIZE
Batch size for inference - how many images are processed
through the model at once
--pin-memory-disabled
Whether to disable `pin_memory` in the dataloader.
Keeping pin memory enabled usually speeds up processing,
but sometimes leads to memory leaks.
```
Therefore, you can create advanced queries in df3d-cli, for example:
```bash
df3d-cli -f /path/to/text.txt \ # process each line from the text file
-r \ # recursively search for images folder under each line of the text line
--order 0 1 2 3 4 5 6 \ # set the camera order
-n 100 \ # process only the first 100 images
--output-folder results \ # save output into results/ instead of /your/image/path/df3d/
--vv \ # will print agressivelly, for debugging purposes
--skip-pose-estimation \ # will not run 2d pose estimation, instead will do calibration, triangulation and will save results
--video-2d \ # will make 2d video for each folder
--video-3d \ # will make 3d video for each folder
--output-fps 15.0 \ # set output video FPS to 15 (instead of using the input video FPS)
```
To test df3d-cli, you run it on a folder for only 100 images, make videos, and print agressivelly for debugging:
```bash
df3d-cli /path/to/images/ -n 100 -vv
```
# Python Interface
Optionally, you can also use df3d on directly python.
```python
from df3d.core import Core
from df3d import video
core = Core(input_folder='../sample/test/', num_images_max=100, output_subfolder='df3d_py', camera_ordering=[0,1,2,3,4,5,6])
core.pose2d_estimation()
core.calibrate_calc(min_img_id=0, max_img_id=100)
# save df3d_result file under '../sample/test/df3d_py'
core.save()
# make videos
video.make_pose2d_video(
core.plot_2d, core.num_images, core.input_folder, core.output_folder
)
video.make_pose3d_video(
core.get_points3d(),
core.plot_2d,
core.num_images,
core.input_folder,
core.output_folder,
)
```
In general following functions are available for Core module:
```python
class Core:
def __init__(self, input_folder, num_images_max): # 9 lines
def setup_cameras(self): # 38 lines
# attribute access
@property def input_folder(self): # 2 lines
@property def output_folder(self): # 2 lines
@property def image_shape(self): # 2 lines
@property def number_of_joints(self): # 3 lines
def has_pose(self): # 1 lines
def has_heatmap(self): # 1 lines
def has_calibration(self): # 4 lines
# interactions with pose-estimation
def update_camera_ordering(self, cidread2cid): # 12 lines
def pose2d_estimation(self): # 14 lines
def next_error(self, img_id): # 1 lines
def prev_error(self, img_id): # 1 lines
def calibrate_calc(self, min_img_id, max_img_id): # 35 lines
def nearest_joint(self, cam_id, img_id, x, y): # 10 lines
def move_joint(self, cam_id, img_id, joint_id, x, y): # 10 lines
def save_calibration(self): # 3 lines
def save_pose(self): # 63 lines
def save_corrections(self): # 1 line
# visualizations
def plot_2d(self, cam_id, img_id, with_corrections=False, joints=[]): # 33 lines
def plot_heatmap(self, cam_id, img_id, joints=[]): # 5 lines
def get_image(self, cam_id, img_id): # 4 lines
# private helper methods
def next_error_in_range(self, range_of_ids): # 6 lines
def get_joint_reprojection_error(self, img_id, joint_id, camNet): # 11 lines
def joint_has_error(self, img_id, joint_id): # 4 lines
def solve_bp_for_camnet(self, img_id, camNet): # 29 lines
```
# Videos
Using the flag --video-2d with df3d-cli will create the following video:

Using the flag --video-3d with df3d-cli will create the following video:

When generating videos with `--video-2d` or `--video-3d`, you can control the output video frame rate using the `--output-fps` flag. If not specified, the output video framerate will be set to equal the input videos' framerate.
# Output
df3d-cli saves results under df3d_result.pk file. You can read it using,
```python
result_path = '../sample/test/df3d/df3d_result*.pkl'
d = pickle.load(open(glob.glob(pr_path)[0], 'rb'))
```
This will read a dictionary with the following keys:
```python
d.keys()
>>> dict_keys([0, 1, 2, 3, 4, 5, 6, 'points3d', 'points2d', 'points3d_wo_procrustes', 'camera_ordering', 'heatmap_confidence'])
```
## Points2D
Detected 2D keypoints are hold under d['points2d'], which is a 4 dimensional tensor.
```python
d['points2d'].shape
>>> (7, 15, 38, 2) # [CAMERAS, TIMES, JOINTS, 2D]
```
You can read the corresponding 2D points from a particular camera from a particular time using,
```python
row, column = d['points2d'][CAMERA, TIME, JOINT]
```
The points are in the (row, column) format.
You can also visualize which keypoints in results belongs to which keypoints on the animal:
```python
import matplotlib.pyplot as plt
image_path = '../sample/test/camera_{cam_id}_img_{img_id}.jpg'
pr_path = '../sample/test/df3d/df3d_result*.pkl'
cam_id, time = 0, 0
plt.imshow(plt.imread(image_path.format(cam_id=0,img_id=0)))
plt.axis('off')
for joint_id in range(19):
x, y = d['points2d'][cam_id, time][joint_id, 1] * 960, d['points2d'][cam_id, time][joint_id, 0] * 480
plt.scatter(x, y, c='blue', s=5)
plt.text(x, y, f'{i}', c='red')
```


## Points3D
You can recalculate the 3D points, given the 2D points and the caibraiton parameters:
```python
from pyba.CameraNetwork import CameraNetwork
import pickle
import glob
image_path = './sample/test/camera_{cam_id}_img_{img_id}.jpg'
pr_path = './sample/test/df3d/df3d_result*.pkl'
d = pickle.load(open(glob.glob(pr_path)[0], 'rb'))
points2d = d['points2d']
# df3d points2d are saved in normalized into [0,1], rescale them into image shape
camNet = CameraNetwork(points2d=points2d*[480, 960], calib=d, image_path=image_path)
points3d = camNet.triangulate()
```
Camera 0 corresponds to origin. It's camera center (not the translation vector) corresponds to 0 point.

## Camera Ordering
The same camera ordering as given input using --order flag in cli.
```python
d["camera_ordering"]
>>> array([0, 1, 2, 3, 4, 5, 6])
```
## Heatmap Confidence
Stacked Hourglass confidence values for each joint predicted. Given an unnormalized posterior distribution heatmap H over the pixels, we take the argmax_{h, w} H for the final prediction and H[h, w] for the confidence level.

## Calibration
df3d_result files also have the calculated calibration parameters for each camera. Each calibration section includes
1. rotation matrix R
2. translation vector tvec,
3. intrinsic matrix intr,
4. distortion parameters distort.
```python
calib = {0: {'R': array([[ 0.90885957, 0.006461 , -0.41705219],
[ 0.01010426, 0.99924554, 0.03750006],
[ 0.41697983, -0.0382963 , 0.90810859]]),
'tvec': array([1.65191596e+00, 2.22582670e-02, 1.18353733e+02]),
'intr': array([[1.60410e+04, 0.00000e+00, 2.40000e+02],
[0.00000e+00, 1.59717e+04, 4.80000e+02],
[0.00000e+00, 0.00000e+00, 1.00000e+00]]),
'distort': array([0., 0., 0., 0., 0.])},
1: {'R': array([[ 0.59137248, 0.02689833, -0.80594979],
[-0.00894927, 0.9996009 , 0.02679478],
[ 0.80634887, -0.00863303, 0.59137718]]),
'tvec': array([ 1.02706542e+00, -9.25820468e-02, 1.18251732e+02]),
'intr': array([[1.60410e+04, 0.00000e+00, 2.40000e+02],
[0.00000e+00, 1.59717e+04, 4.80000e+02],
[0.00000e+00, 0.00000e+00, 1.00000e+00]]),
'distort': array([0., 0., 0., 0., 0.])},
}
```
The coordinate system is compatible with OpenCV, where z-axis corresponds to axis going out of camera.
# Running GUI
GUI is primarily used for correcting the false 2D pose estimation results in the 'Correction' mode. Your changes will be saved under df3d folder and will be used for the final df3d_result file.
**Currently, you can only use GUI after running the df3d on the cli on the same folder.**
After installing the dependencies we can initialize the GUI using the command line entry point:

```
df3d ./data/test/ 15
```
The second argument sets the image folder, while the third argument sets the upper bound for the images, in case you only want to process the subset of images.
This should start the GUI:

you can optionally remove `/FULL/PATH_FOLDER` and `NUM_IMAGES`, in which case pop-up apperas the select the folder.
 After completing pose estimation in the cli, you can open the pose mode:

# Development
DeepFly3D consists of 3 pip packages:
- DeepFly3D: https://pypi.org/project/df3d/
- PyBundleAdjustment: https://pypi.org/project/pyba/
- DeepFly2D: https://pypi.org/project/df2d/
The master branch of the DeepFly3D package is kept up-to-date with the last version of the pip package. Development is done under dev branch. Before pushing changes to the master branch, make sure all test cases are passing. You can run the tests using `python -m unittest discover`. Unittests make sure several scenarios can be processed using cli without failing.
# Releasing a new version
1. Update the version in `setup.py` (eg. 1.0.1)
2. Create a tag for the release that matches the new version (eg. v1.0.1)
3. Push the latest commit and tag - this will trigger a github action to make a new release for DeepFly3D on pypi and github
4. Edit the github release https://github.com/NeLy-EPFL/DeepFly3D/releases to add information about the latest changes
# References
You can cite our paper in case you find it useful.
```
@inproceedings{Gunel19DeepFly3D,
author = {Semih G{\"u}nel and
Helge Rhodin and
Daniel Morales and
João Compagnolo and
Pavan Ramdya and
Pascal Fua},
title = {DeepFly3D, a deep learning-based approach for 3D limb and appendage tracking in tethered, adult Drosophila},
bookTitle = {eLife},
doi = {10.7554/eLife.48571},
year = {2019}
}
```
# Version History
### Changes in 0.5
- Major internal rewrite.
### Changes in 0.4
- Using the CLI, the output folder can be changed using the `--output-folder` flag
- CLI and GUI now use the same pose estimation code, so changes will automatically propagate to both
- Minor tweaks in the GUI layout, functionality kept unchanged
### Changes in 0.3
- Results are saved in df3d folder instead of the image folder.
- Much faster startup time.
- Cameras are automatically ordered using Regular Expressions.
- CLI improvements. Now it includes 3D pose.
### Changes in 0.2
- Changing name from deepfly3d to df3d
- Adding cli interface with df3d-cli
- Removing specific dependencies for numpy and scipy
- Removing L/R buttons, so you can see all the data at once
- Removing the front camera
- Faster startup time, less time spent on searching for the image folder
- Better notebooks for plotting
- Adding procrustes support. Now all the output is registere to template skeleton.
- Bug fixes in CameraNetwork. Now calibration with arbitrary camera sequence is possible.
## Extras:
* If you are interested in the online annotation tool instead: [DeepFly3DAnnotation](https://github.com/NeLy-EPFL/DeepFly3DAnnotation)
* To see the dataset used in the paper: [Dataverse](https://dataverse.harvard.edu/dataverse/DeepFly3D)
After completing pose estimation in the cli, you can open the pose mode:

# Development
DeepFly3D consists of 3 pip packages:
- DeepFly3D: https://pypi.org/project/df3d/
- PyBundleAdjustment: https://pypi.org/project/pyba/
- DeepFly2D: https://pypi.org/project/df2d/
The master branch of the DeepFly3D package is kept up-to-date with the last version of the pip package. Development is done under dev branch. Before pushing changes to the master branch, make sure all test cases are passing. You can run the tests using `python -m unittest discover`. Unittests make sure several scenarios can be processed using cli without failing.
# Releasing a new version
1. Update the version in `setup.py` (eg. 1.0.1)
2. Create a tag for the release that matches the new version (eg. v1.0.1)
3. Push the latest commit and tag - this will trigger a github action to make a new release for DeepFly3D on pypi and github
4. Edit the github release https://github.com/NeLy-EPFL/DeepFly3D/releases to add information about the latest changes
# References
You can cite our paper in case you find it useful.
```
@inproceedings{Gunel19DeepFly3D,
author = {Semih G{\"u}nel and
Helge Rhodin and
Daniel Morales and
João Compagnolo and
Pavan Ramdya and
Pascal Fua},
title = {DeepFly3D, a deep learning-based approach for 3D limb and appendage tracking in tethered, adult Drosophila},
bookTitle = {eLife},
doi = {10.7554/eLife.48571},
year = {2019}
}
```
# Version History
### Changes in 0.5
- Major internal rewrite.
### Changes in 0.4
- Using the CLI, the output folder can be changed using the `--output-folder` flag
- CLI and GUI now use the same pose estimation code, so changes will automatically propagate to both
- Minor tweaks in the GUI layout, functionality kept unchanged
### Changes in 0.3
- Results are saved in df3d folder instead of the image folder.
- Much faster startup time.
- Cameras are automatically ordered using Regular Expressions.
- CLI improvements. Now it includes 3D pose.
### Changes in 0.2
- Changing name from deepfly3d to df3d
- Adding cli interface with df3d-cli
- Removing specific dependencies for numpy and scipy
- Removing L/R buttons, so you can see all the data at once
- Removing the front camera
- Faster startup time, less time spent on searching for the image folder
- Better notebooks for plotting
- Adding procrustes support. Now all the output is registere to template skeleton.
- Bug fixes in CameraNetwork. Now calibration with arbitrary camera sequence is possible.
## Extras:
* If you are interested in the online annotation tool instead: [DeepFly3DAnnotation](https://github.com/NeLy-EPFL/DeepFly3DAnnotation)
* To see the dataset used in the paper: [Dataverse](https://dataverse.harvard.edu/dataverse/DeepFly3D)