# imooc-lego
**Repository Path**: Mr_Mikey/imooc-cli-dev
## Basic Information
- **Project Name**: imooc-lego
- **Description**: 慕课网前端架构师课程笔记。https://class.imooc.com/sale/fearchitect
- **Primary Language**: Unknown
- **License**: Not specified
- **Default Branch**: master
- **Homepage**: None
- **GVP Project**: No
## Statistics
- **Stars**: 0
- **Forks**: 4
- **Created**: 2024-08-28
- **Last Updated**: 2024-08-28
## Categories & Tags
**Categories**: Uncategorized
**Tags**: None
## README
# 介绍
自己看视频过程中的一些笔记。
代码部分和老师的不完全一样。
* 流程图:https://whimsical.com/mongodb-RTJphPrwzksyotCdA32LQU
* 需求文档:https://imooc-lego.yuque.com/imooc-lego/zlz87z
* 作业|学习笔记:https://homework.imooc-lego.com/
* 慕课网:https://class.imooc.com/fearchitect#Anchor
`imooc-cli-dev` 为脚手架代码
`imooc-cli-dev-server` 为模板代码的服务端
`lego` 为前端代码
`imook-bricks` 为组件库代码
# 项目笔记
## 第一周:需求分析和架构设计
> 浅层学习看输入,深入学习看输出!
## 第二周:脚手架架构设计和框架搭建
### 创建脚手架流程
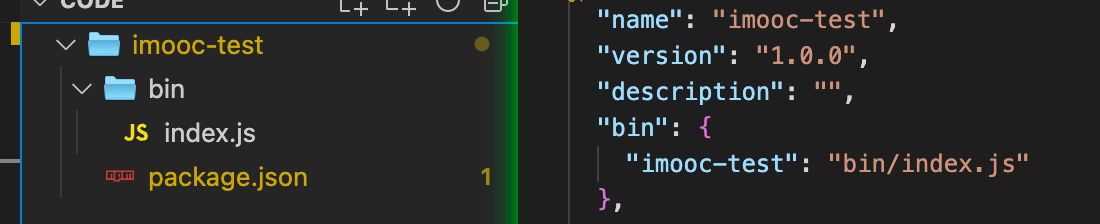
package.json 中添加 `bin:{"imooc-test":"bin/index.js"}`
#### 脚手架参数解析
```javascript
const process = require('process')
const argv = process.argv
```
### Lerna
#### lerna 搭建脚手架
```javascript
lerna init // 初始化 lerna 项目
lerna create core // 通过 lerna 创建分包
```
分包 name 规则:`"name": "@imooc-yishen-cli-dev/core"` ,`@imooc-yishen-cli-dev` 为 `Organizations` 名称;`core` 为分包名称。
#### lerna 本地依赖实现方式
```javascript
"dependencies": {
"@imooc-yishen-cli-dev/utils": "file:../utils"
}
// 执行 lerna publish 时lerna 会帮我们将 file:../utils 提换成线上链接
```
## 第三周:脚手架核心流程开发
### 脚手架架构设计
#### 脚手架架构设计图

#### 脚手架拆包策略
* 核心流程:core
* 命令:commands
* 初始化
* 发布
* 清除缓存
* 模型车:models
* Command 命令
* Project 项目
* Component 组件
* Npm 模块
* Git 仓库
* 支撑模块:utils
* Git 操作
* 云构建
* 工具方法
* API 请求
* Git API
#### core 模块技术方案

## 第四周 脚手架命令注册和执行过程开发

execCommand

## 第五周 脚手架创建项目流程设计和开发
项目/组件的初始化

## 第六周 脚手架项目和组件初始化开发
项目/组件初始化中的安装模板步骤

### ejs 模板引擎
* https://github.com/mde/ejs
#### 基本用法
```javascript
const html = '<%= user.name %>
'
const options = {}
const data = {
user: {
name: 'yishen',
blog:'https://mdashen.com'
},
}
const data2 = {
user: {
name: 'yishen_2',
},
}
```
1. compile 渲染
```javascript
// compile 相比 渲染变量更消耗资源。所以设计:只需 compile 一次,就可渲染多个template
const template = ejs.compile(html, options)
const compileTemplate = template(data)
const compileTemplate2 = template(data2)
console.log(compileTemplate, compileTemplate2)
// out
yishen
yishen_2
```
2. render 渲染
```javascript
ejs.render(html, data, options);
// 不需要反复使用 1. 中的template 可直接使用此方法。若需要对 template 反复使用,建议使用第一种方法。性能有提升
```
3. 读取文件渲染
```javascript
ejs.renderFile(filename, data, options, function(err, str){
// str => Rendered HTML string
});
// filename 为文件路径。
```
#### 标签
- `<%` 'Scriptlet' tag, for control-flow, no output
- `<%_` 'Whitespace Slurping' Scriptlet tag, strips all whitespace before it
- `<%=` Outputs the value into the template (escaped)
- `<%-` Outputs the unescaped value into the template
- `<%#` Comment tag, no execution, no output
- `<%%` Outputs a literal '<%'
- `%%>` Outputs a literal '%>'
- `%>` Plain ending tag
- `-%>` Trim-mode ('newline slurp') tag, trims following newline
- `_%>` 'Whitespace Slurping' ending tag, removes all whitespace after it
## 第七周 B端项目需求分析和架构设计
流程图:https://whimsical.com/mongodb-RTJphPrwzksyotCdA32LQU
需求:https://imooc-lego.yuque.com/imooc-lego/zlz87z
## 第八周 前端基础技术回顾和巡礼
### Typescript
```typescript
// interface 约束函数
const sum = (x: number, y: number) => {
return x + y
}
interface Isum {
(x: number, y: number): number
}
const sum2: Isum = sum
// 可变属性名
interface RandoMap {
[propName: string]: string
}
const test: RandoMap = {
a: 'hello',
b: 'hello',
}
```
```typescript
// interface 约束类
// 实例类型
interface ClockInterface {
currentTime: number
alert(): void
}
// 静态类型
interface ClockStatic {
// new 表示这个约束可以被new调用(即构造函数)
new (h: number, m: number): void
}
// ClockStatic 用来约束构造函数。ClockInterface用来约束class。静态类型和实例类型共同约束class
// implements 关键词 类来实现接口
const Clock: ClockStatic = class Clock implements ClockInterface {
currentTime = 0
alert: () => {}
constructor(h: number, m: number) {}
}
interface GameInterface {
play(): void
}
class Cellphone implements ClockInterface, GameInterface {
currentTime: number
alert() {}
play() {}
}
```
```typescript
// 泛型
// 第一个T:代表使用泛型 需要使用<>包裹
// 第二个T:代表参数的类型
// 第三个T:代表函数的返回值类型
function echo(arg: T): T {
return arg
}
const numberResult = echo(1)
const stringResult = echo('123')
```

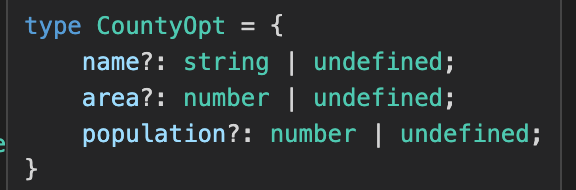
```typescript
// TS 操作类型
interface CountryResp {
name: string
area: number
population: number
}
// keys 联合类型:name || area || population
type Keys = keyof CountryResp
type NameType = CountryResp['name']
type Test = {
[key in Keys]: any
}
type CountyOpt = {
[p in Keys]?: CountryResp[p]
}
```
```typescript
// 泛型约束
interface IWidthLength {
length: number
}
// 传入的参数 arg 必须携带有 length 属性
function echoWithArr(arg: T): T {
console.log(arg.length)
return arg
}
const arrs = echoWithArr([1, 2, 3])
const str = echoWithArr('123')
const obj = echoWithArr({ length: 123 })
```
### Vue3
纯函数 pure function
* 相同的输入,永远会得到相同的输出
* 没有副作用
watch 遇到非响应式值的情况

## 第九周 项目整体搭建
## 第十周 业务组件库初步开发,业务组件属性的展示和更新
jsx写法
https://cn.vuejs.org/guide/extras/render-function.html#jsx-tsx
### tsx
```tsx
import { defineComponent } from 'vue'
export default defineComponent({
props: {
vNode: {
type: [Object, String],
required: true
}
},
render() {
return this.vNode
}
})
```
相比template sfc,灵活,可以用js来表达各种逻辑,但是可读性差。
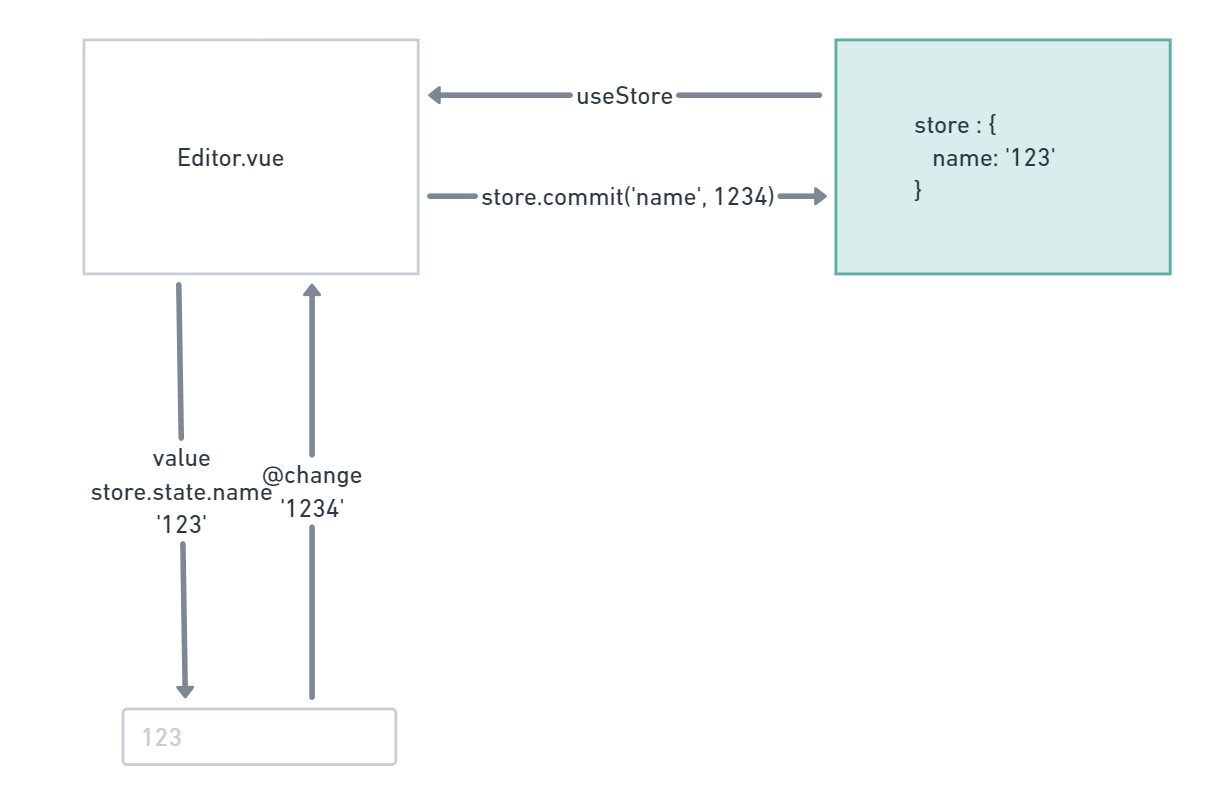
结论:**优先选择 template ,当template写起来费劲使用tsx**
核心实现:数据流转方式。**单向数据流**
## 第十一周 掌握测试基本工具,给组件库添加单元测试
### 测试框架 Jest
官网:https://jestjs.io/
测试框架的功能
* 断言
* 异步支持
* Mock
* 代码覆盖率
### jest 基础
当然,以下是一些与 Jest 测试相关的常见名词及其简要介绍:
**Test Suite(测试套件)**
一个测试套件包含一组相关的测试用例。在 Jest 中,一个测试套件使用 `describe` 函数定义。
```javascript
javascriptCopy codedescribe('Math operations', () => {
// 测试用例
});
```
**Test Case(测试用例)**
测试用例是具体的单元测试,用于验证代码的某个特定行为。在 Jest 中,使用 `test` 或 `it` 函数定义测试用例。
```js
javascriptCopy codetest('adds 1 + 2 to equal 3', () => {
expect(1 + 2).toBe(3);
});
```
* 创建mock function ,在测试中使用,用来测试回调。
* 手动mock,覆盖第三方实现。
```ts
// mock
const mockTest = (shouldCall: any, cb: any) => {
if (shouldCall) {
cb(42)
return cb(42)
}
}
it('test with mock function', () => {
const mockCb = jest.fn()
mockTest(true, mockCb)
//期待 mockCb 被调用:断言
expect(mockCb).toHaveBeenCalled()
// 校验参数
expect(mockCb).toHaveBeenCalledWith(42)
// 调用次数
expect(mockCb).toHaveBeenCalledTimes(2)
})
```
* jest timers mock
```ts
// mock timer
const loopFetchUser = (cb: any) => {
setTimeout(() => {
cb('one')
setTimeout(() => {
cb('two')
}, 2000)
}, 1000)
}
// jest 结果事件控制器,setTimeout,setinterval 之类函数会被影响
jest.useFakeTimers()
it('test the callback after 1 sec', () => {
const callback = jest.fn()
loopFetchUser(callback)
expect(callback).not.toHaveBeenCalled()
jest.runOnlyPendingTimers()
expect(callback).toHaveBeenCalled()
expect(callback).toHaveBeenCalledTimes(1)
expect(callback).toHaveBeenCalledWith('one')
jest.runOnlyPendingTimers()
expect(callback).toHaveBeenCalledTimes(2)
expect(callback).toHaveBeenCalledWith('two')
// 前进多少ms
// jest.advanceTimersByTime(500)
})
```
#### 测试准备和结束
一次性完成测试准备。可以在这里定义一些每个用例都需要使用的共享状态
* beforeAll
* afterAll
每个用例前的测试准备。如果这个用例,不需要beforeAll中的共享,可以使用这个清除共享状态。
* beforeEach
* afterEach
### vue test utils
> 提供特定的方法,在隔离的环境下,进行组件的挂载,以及一些列的测试。
vite中使用:https://vitest.dev/
https://cn.vuejs.org/guide/scaling-up/testing.html
### 测试内容
```json
"scripts": {
"test:unit": "vitest --watch",
},
```
test 命令 :`"test:unit": "vitest --watch"` 结尾处添加--watch 可以监听模式
vscode 可以安装 https://marketplace.visualstudio.com/items?itemName=vitest.explorer
**mount和shallowMount区别**
* mount全部渲染
* shallowMount 只渲染组件本身,外来子组件不渲染
* shallowMount更快,更适合单元测试
#### mock全局组件
* 方法一,mock实现组件
helloworld.vue
```vue
ant button
{{ props.msg }}
```
mock用例
```ts
import { shallowMount, mount, VueWrapper } from '@vue/test-utils'
import { describe, it, expect, beforeAll, vitest } from 'vitest'
import HelloWrold from '../components/HelloWorld.vue'
let wrapper: VueWrapper
vitest.mock('ant-design-vue')
const mockComponent = {
template: `
`
}
const globalComponents = {
'a-button': mockComponent
}
describe('HelloWrold', () => {
beforeAll(() => {
wrapper = mount(HelloWrold, {
props: {
msg: 'msg'
},
global: {
components: globalComponents
}
})
})
it('renders props.msg when passed', () => {
expect(wrapper.text()).toContain('msg')
console.log(wrapper.html())
})
})
```
* 方法一,mock实现
vue组件
```vue
```
用例
```typescript
import { message } from 'ant-design-vue'
vitest.mock('ant-design-vue', () => ({
message: {
success: vitest.fn()
}
}))
it('message is beCall', async () => {
expect(message.success).toBeCalled()
expect(message.success).toBeCalledTimes(1)
expect(message.success).toBeCalledWith('Hello World!')
})
```
* 方法二:直接使用真实的
```ts
import store from '../stores/editor'
beforeAll(() => {
wrapper = mount(HelloWrold, {
global: {
provide: {
store
}
}
})
})
```
## 第十二周 通用上传组件开发以及使用
#### input.value 属性
```vue
```
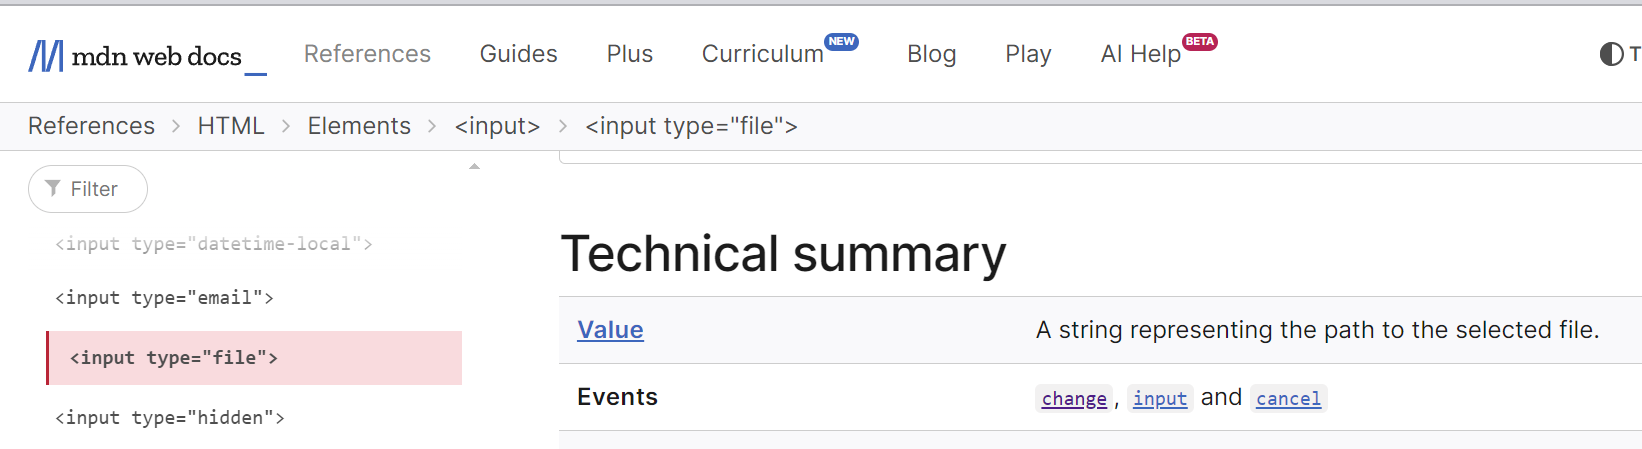
https://developer.mozilla.org/en-US/docs/Web/HTML/Element/input/file#value
> A file input's [`value`](https://developer.mozilla.org/en-US/docs/Web/HTML/Element/input#value) attribute contains a string that represents the path to the selected file(s). If no file is selected yet, the value is an empty string (`""`).
#### 本地图片预览
> 快速预览本地图片,不需要等待图片上传完成。
* [URL: createObjectURL()](https://developer.mozilla.org/en-US/docs/Web/API/URL/createObjectURL_static) 返回 url 类似 `blob:http://192.168.83.113:5173/65e2ae70-33d7-407e-9019-1d99c98a0595`;得到当前文件的一个内存 URL;多次使用需通过: [`URL.revokeObjectURL()`](https://developer.mozilla.org/en-US/docs/Web/API/URL/revokeObjectURL_static) 手动释放内存。
* [FileReader: readAsDataURL()](https://developer.mozilla.org/en-US/docs/Web/API/FileReader/readAsDataURL) 返回 base64
## 第十三周 业务组件库打包、发布,添加 CI/CD
### JavaScript模块、发展历史
1. 全局变量+命名空间 namespace
* jquery库这样,创建一个封闭的作用域,赋值给一个全局变量
2. Common.js
* ```javascript
const bar = require('./bar')
module.exports = function(){}
```
* 主要服务于服务端nodejs
* 没法在浏览器里直接使用。
3. AMD、Asynchronous module definition、异步模块定义
* 异步方式加载模块
* AMD 的代表性特点是 `define` 和 `require` 函数
* ```js
define(function(require){
// 通过相对路径获取依赖模块
const bar = require('./bar')
// 模块产出
return function(){}
})
```
4. UMD、Universal Module Deinition
* 兼容 AMD 和 CommonJS规范,浏览器可以直接运行。(像是html中直接srcipt标签那样)
* 不支持 tree shaking
5. **ES6 模块化**、esm模块
* ```javascript
import bar from './bar'
export default function(){}
```
### Bundler、打包工具
> import export 这种同步加载的方式,大多数浏览器中无法使用
>
> 将浏览器不支持的模块进行编译,转换,合并成在浏览器运行良好的工具。
#### Webpack
* https://webpack.js.org/
* 采用单js文件入口
* vue-cli 内置打包工具
#### Rollup
> 设计之初就是面向 ES module 的,构建出**结构扁平,性能出众**的类库(`纯js项目`)
* https://rollupjs.org/
* 支持 Tree shaking 机制。(不打包 引入了,但没有使用的模块/部分,减小打包体积)
#### Snowpack
> 当资源越来越多的时候,打包速度越来越慢。
* 不会被打包(利用新版浏览器支持 es modules 特性)
* 每个文件编译一次,永久被缓存,当一个文件修改的时候,重新build这一个文件。
* 处理 node_modules 中模块,将单文件转换为esm模块,在浏览器中直接使用。
### vue3 插件系统
> 插件 (Plugins) 是一种能为 Vue 添加全局功能的工具代码
* https://cn.vuejs.org/guide/reusability/plugins.html
```ts
// test.plugin.ts
import { App } from 'vue'
const plugins = {
install: (app: App) => {
app.config.globalProperties.$echo = (string: string) => {
console.log(string)
}
// 注册全局组件
app.component('HelloWorld', HelloWorld)
// 全局 provide
app.provide('test', {
message: 'from plugin',
})
},
}
export default plugins
```
```ts
// src/main.ts
import testPlugin from '../test.plugin'
const app = createApp(App)
app.use(testPlugin)
```
```vue
// src/App.vue
```
#### 组件库实现
实现效果
可以像组件库那样,一次导入全部组件。或者导入单个组件。
```ts
import legoBricks from 'lego-bricks'
import { LText,LImage } from 'lego-bricks'
```
```sh
# 项目结构
├── components
│ ├── LImage
│ │ ├── index.ts // 定义导出,install函数
│ │ └── LImage.vue // 组件实现
│ └── LText
│ ├── index.ts
│ └── LText.vue
├── index.ts // 导出全部组件
```
```ts
// components/LText/index.ts
import { App } from 'vue'
import LText from './LText.vue'
LText.install = (app: App) => {
app.component(LText.name, LText)
}
export default LText
```
```ts
// index.ts
import { App } from 'vue'
import LText from '@/components/LText'
import LImage from '@/components/LImage'
const components = [LText, LImage]
const install = (app: App) => {
components.forEach((component) => {
app.component(component.name, component)
})
}
export { LText, LImage, install }
export default {
install,
}
```
### npm 依赖
* dependencies
* 项目业务逻辑需要依赖的第三方库
* devDependencies
* 开发模式工作流下依赖的第三方库
* 单元测试、语法转换、lint 工具、程序构建、本地开发等。
* peerDependencies
* 需要核心依赖库,不能脱离依赖库单独使用
### CI/CD
> 本地 commit 钩子函数完成 commit 验证
>
> 代码 push 后,跑 test(unit test 、E2E test)
>
> 检查新 tag,有新 tag 自动 publish 一个新版本
>
> 自动部署文档站点
一些流程自动化
CI、continuous integration、持续集成
CD、continuous delivery、持续交付;continuous deployment、持续部署;
相关服务
* GitHub Actions、https://github.com/features/actions
* Travis、https://www.travis-ci.com/
* husky、https://github.com/typicode/husky、git hooks
## 第十四周 后端技术选型以及基础知识巩固
### Express 中间件
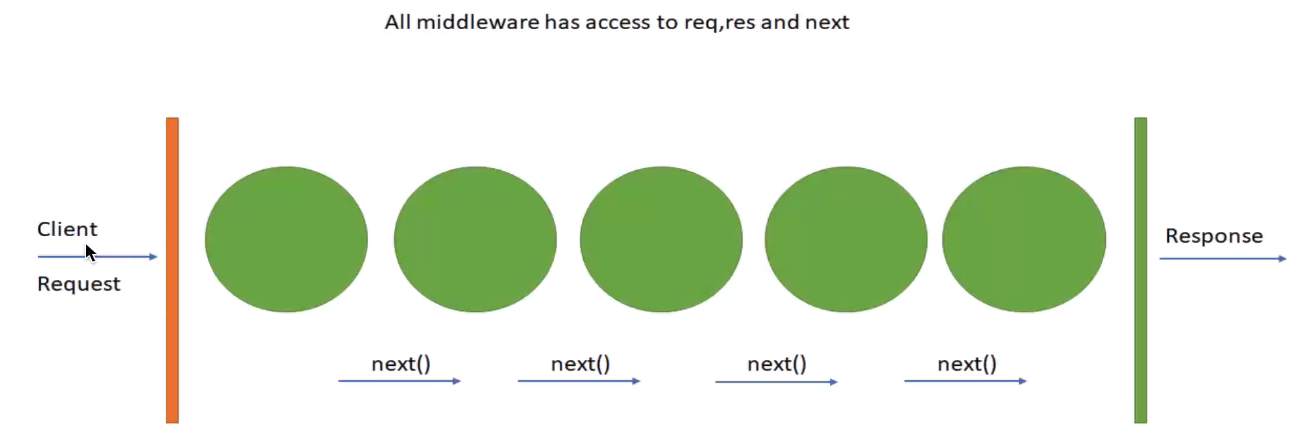
线性执行,执行完一个中间件,继续执行下一个中间件。
任意一个地方执行 `res.send()`,立即会返回结果。后面的中间件和逻辑不再会执行。
### Koa
koa中间件、洋葱模型
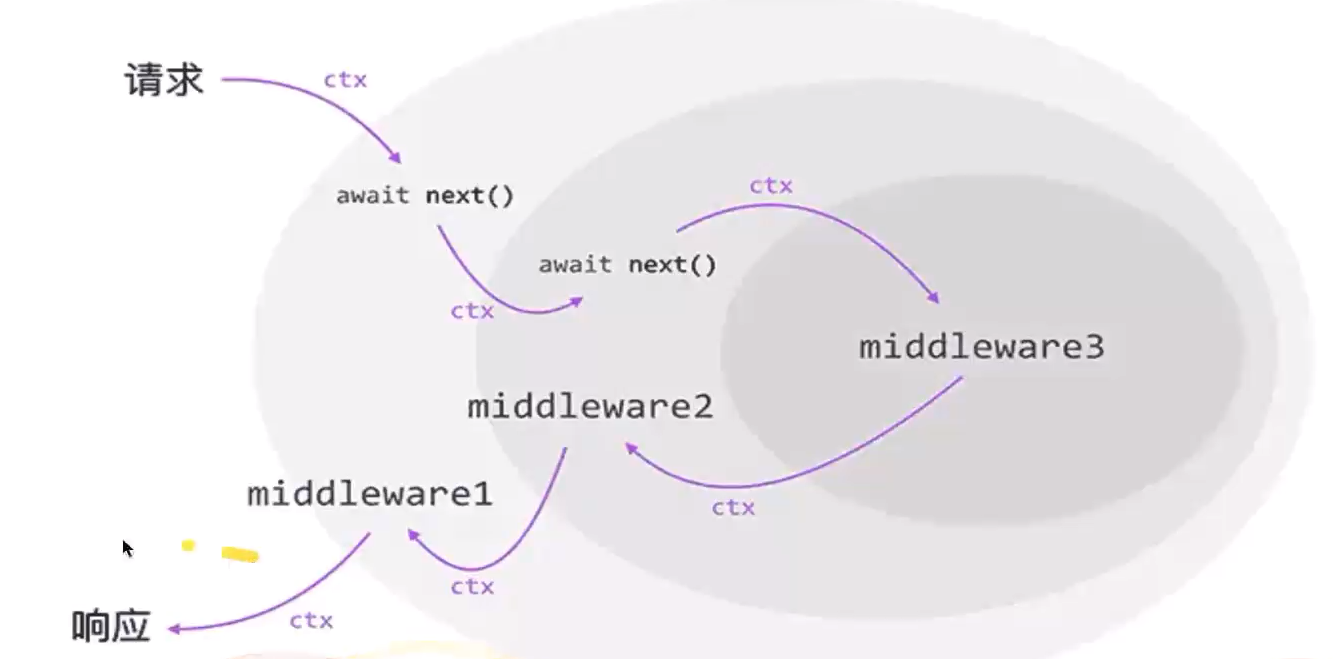
执行 `ctx.body()` 不会立即执行,等待全部中间件结束后才会返回。
### Egg
[Egg](https://www.eggjs.org/)
### 数据库
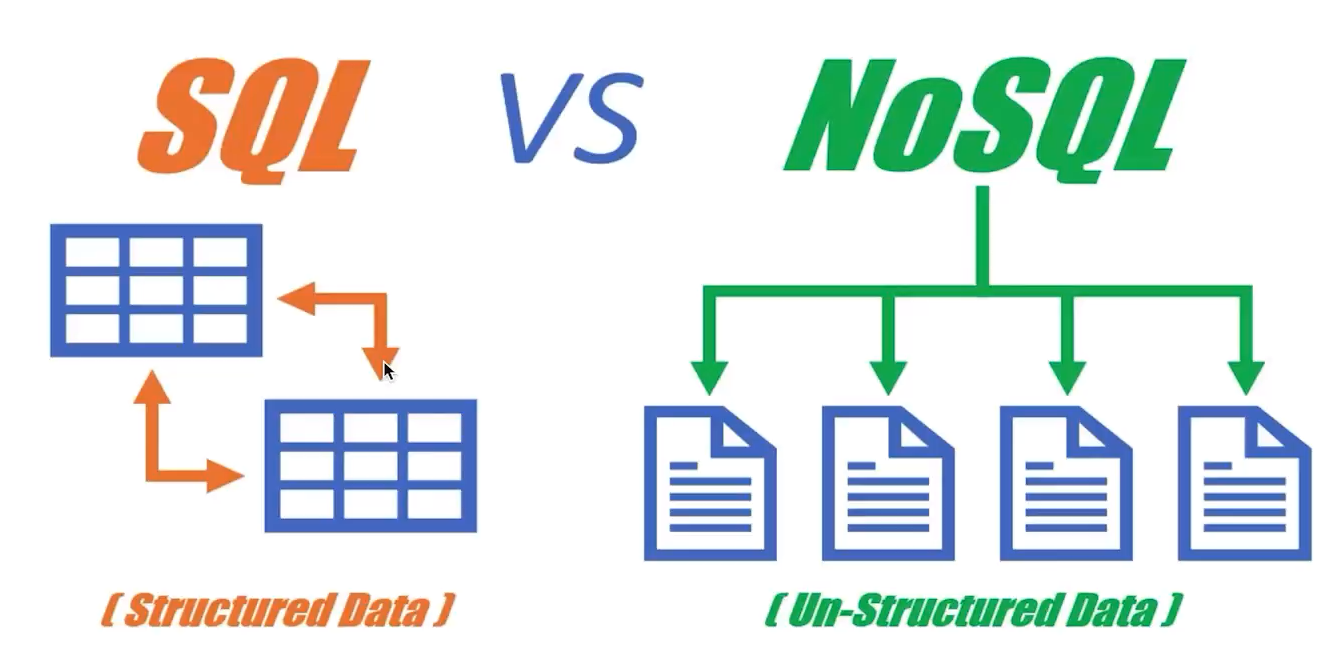
#### 关系型数据库
* 采用关系模型组织数据的数据库。
* 结构化方法存储数据,每个数据库都必须对各个字段定义好。
#### 非关系型数据库
* 灵活的数据模型
* 代表
* **文档存储:MongoDB** (本项目使用此数据库:系统中需要存储大量json数据)
* key value 存储:Redis
* 图存储:Neo4J
### mongoDB
#### CRUD
https://www.runoob.com/mongodb/mongodb-query.html
```sql
# 插入
db.myCollection.insertOne({
name: "Alice",
age: 25,
city: "New York"
});
db.myCollection.insertMany([
{ name: "Bob", age: 30, city: "Los Angeles" },
{ name: "Charlie", age: 35, city: "Chicago" }
]);
# 删除
db.myCollection.deleteOne({ name: "Alice" });
db.myCollection.deleteMany({ status: "inactive" });
db.myCollection.findOneAndDelete(
{ name: "Charlie" },
{ projection: { name: 1, age: 1 } }
);
# 更新
db.myCollection.updateOne(
{ name: "Alice" }, // 过滤条件
{ $set: { age: 26 } }, // 更新操作
{ upsert: false } // 可选参数
);
db.myCollection.updateMany(
{ age: { $lt: 30 } }, // 过滤条件
{ $set: { status: "active" } }, // 更新操作
{ upsert: false } // 可选参数
);
db.myCollection.replaceOne(
{ name: "Bob" }, // 过滤条件
{ name: "Bob", age: 31 } // 新文档
);
db.myCollection.findOneAndUpdate(
{ name: "Charlie" }, // 过滤条件
{ $set: { age: 36 } }, // 更新操作
{ returnDocument: "after" } // 可选参数,返回更新后的文档
);
# 查询
db.myCollection.find({ age: { $gt: 25 } });
db.myCollection.findOne({ name: "Alice" });
```
#### 索引
MongoDB 文件类型:BSON,Binary JSON。
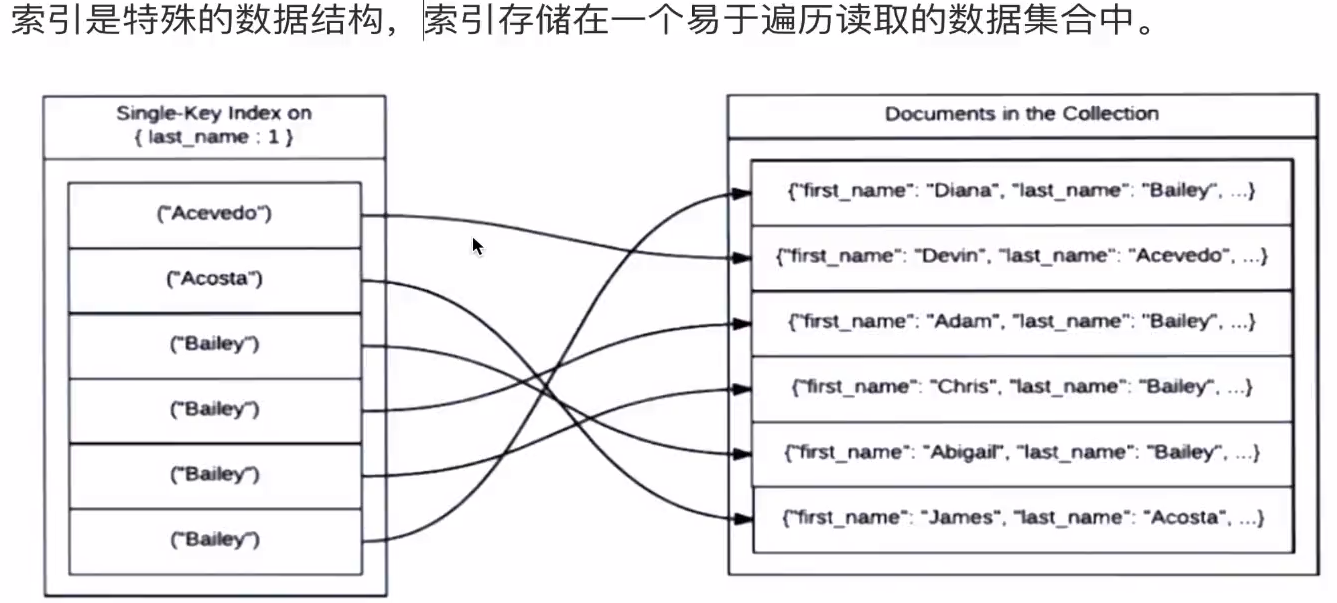
索引可以极大增加查询速度。mongoDB 默认会创建 _id 的索引,如果 document 中有哪个字段经常查询,可以给这个字段 增加索引。
```sql
// 创建 age 字段的升序索引
db.myCollection.createIndex({ age: 1 });
// 创建 name 字段的文本索引
db.myCollection.createIndex({ name: "text" });
```
- 索引虽然可以提高查询性能,但也会增加写操作的开销。因此,在创建索引时需要权衡查询性能和写入性能。
#### 关系
内嵌 Embedding、引用 Referencing
内嵌
* 优势
* 只需要一次查询就可以查询所有信息
* 避免多集合查询
* 劣势
* 单文档太大,查询耗时,获取的无关信息概览增大
引用
* 优势
* 数据分散到不同文档,数据量变小
* 每次查询取得无关信息概览降低
* 劣势
* 需要多次查询才能获得最终数据。
### ODM、ORM
ODM
Object Document Mapping
* 提出 Model,数据模型的概念,用来约束集合中的数据结构
ORM
Object Relational Mapping
通过实例对象的语法,完成关系型数据库操作的技术
* 不需要写晦涩的 SQL 语句
* 语义性好
后端接口设计:https://sh0nh0.yuque.com/sh0nh0/xrt4un/xsfx0l?
数据库设计:https://sh0nh0.yuque.com/sh0nh0/xrt4un/grcg0d?
# 与项目业务无关的一些通用知识点
### 大厂 git 规范讲解

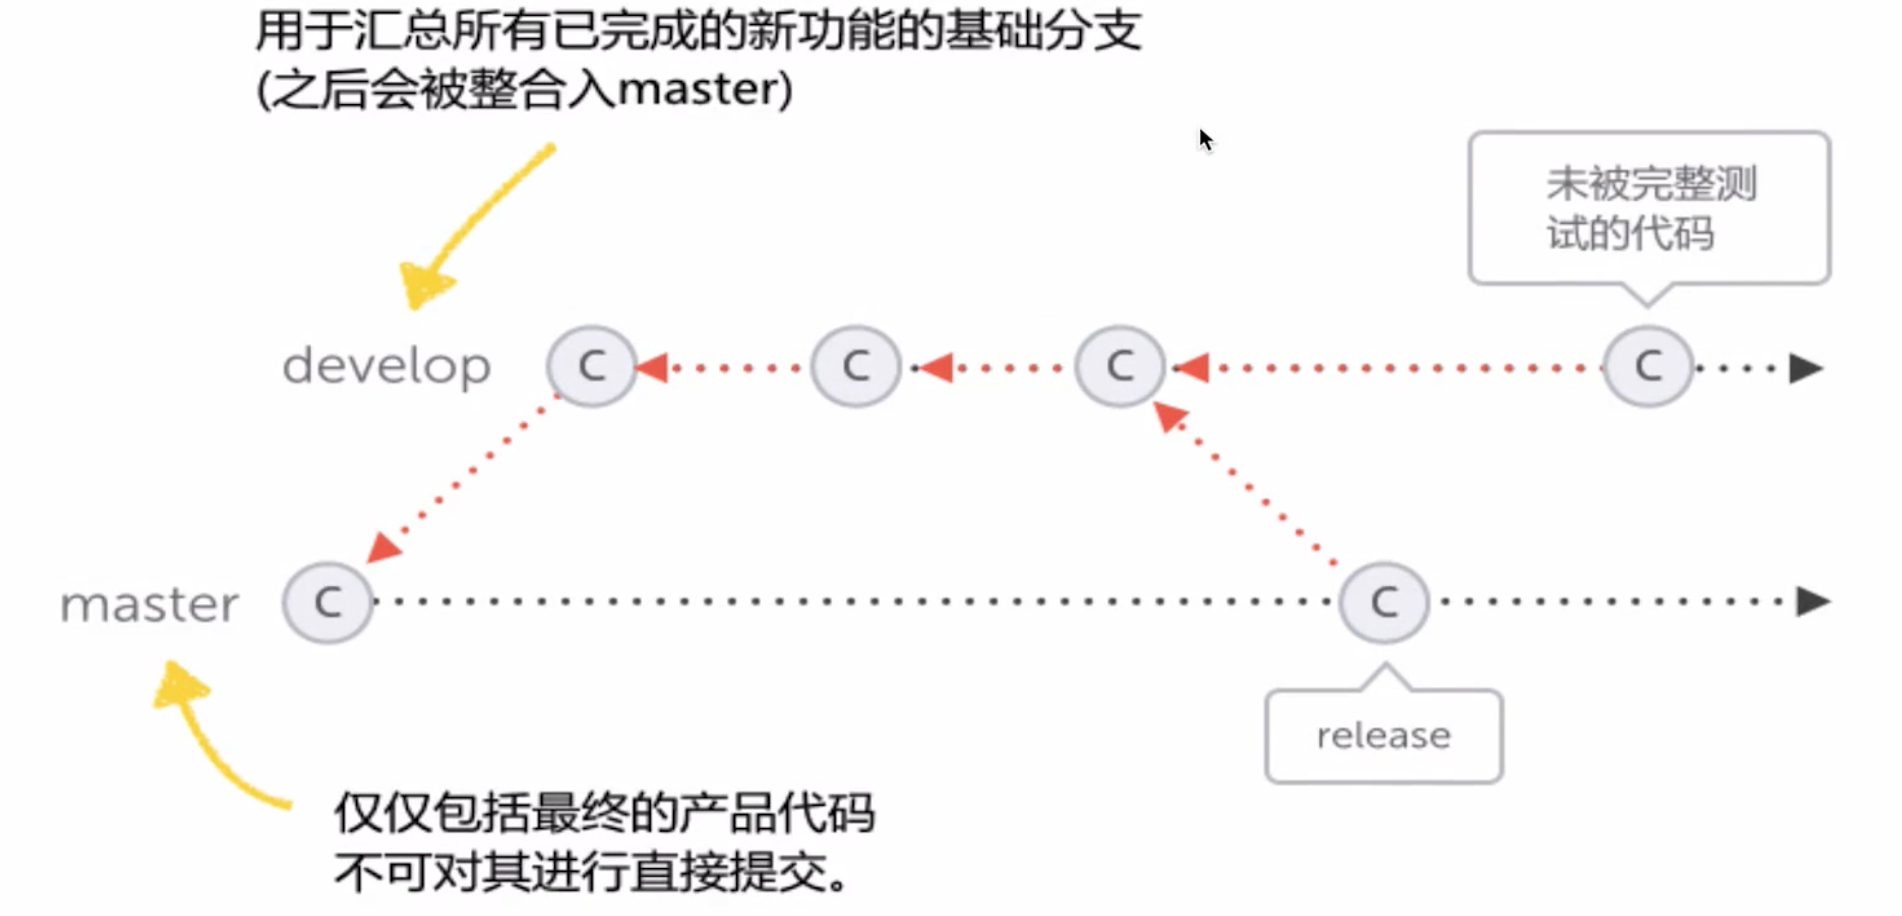
### git flow
### require 加载资源类型
```javascript
const pkg = require('../package.json')
// require 支持.js 、.json 文件
```
* js 文件:`module.exports ` / `exports`
* json文件:JSON.parse 解析成对象
* .node:c++ 插件,不常用
* 其他任意文件,当做.js 解析,解析失败报错。解析成功就是js文件。
### NodeJS 支持 ES Module
两种标准 CommonJS、ES Module
* CommonJS: require()、modulex.exports / exports.x
* ES Module:import、export default / export function/const
#### 通过 webpack 支持模块化
`npm i webpack webpack-cli`
```javascript
// webpack.config.js
const path = require('path')
module.exports = {
entry: './bin/index.js',
mode: 'development',
output: {
path: path.join(__dirname, '/dist'),
filename: 'index.js',
},
}
```
```javascript
// package.json
"scripts": {
"dev": "webpack --watch",
"build": "webpack"
},
```
##### babel 转es5 语法
`npm i babel-loader @babel/core @babel/preset-env`
```javascript
// webpack.config.js
const path = require('path')
module.exports = {
entry: './bin/core.js',
// mode: 'development',
mode: 'production',
output: {
path: path.join(__dirname, '/dist'),
filename: 'index.js',
},
target: 'node',
module: {
rules: [
{
test: /\.js$/,
exclude: /(node_modules|dist)/,
use: {
loader: 'babel-loader',
options:{
presets:['@babel/preset-env']
}
},
},
],
},
}
```
#### 通过 Node 原生支持 ES Module
mjs
* https://stackoverflow.com/questions/57492546/what-is-the-difference-between-js-and-mjs-files
> Node.js's original module system is [CommonJs](https://nodejs.org/docs/latest/api/modules.html) (which uses `require` and `module.exports`).
>
> Since Node.js was created, the [ECMAScript module system](https://nodejs.org/docs/latest/api/esm.html) (which uses `import` and `export`) has become standard and Node.js has added support for it.
>
> Node.js will treat `.cjs` files as CommonJS modules and `.mjs` files as ECMAScript modules. It will treat `.js` files as whatever the default module system for the project is (which is CommonJS unless *package.json* says `"type": "module",`).
>
> See also: [Differences between ES6 module system and CommonJs](https://nodejs.org/docs/latest/api/esm.html#esm_differences_between_es_modules_and_commonjs)
### Node 多进程
* child_process 中创建的进程就是 Node.js 的子进程
* spawn:耗时任务,需要不断日志
* exec/exceFile:开销比较小的任务
```javascript
// 执行命令
cp.exec('ls -al', (error, stdout, stderr) => {
console.log('')
})
// 执行文件
cp.execFile(
path.resolve(__dirname, 'test.shell'),
['-al', '-bl'],
(error, stdout, stderr) => {
console.log(error)
console.log(stdout)
console.log(stderr)
}
)
```
```javascript
const child = cp.spawn(path.resolve(__dirname, 'test.shell'), ['-al', '-bl'], {
cwd: path.resolve('..'),
})
child.stdout.on('data', function (chunk) {
console.log(chunk.toString())
})
child.stderr.on('data', function (chunk) {
console.log(chunk.toString())
})
```
* fork:创建一个新进程(子),通过 node 执行
```javascript
// main
const child = cp.fork(path.resolve(__dirname, 'child.js'))
// 父进程像子进程发送消息
child.send('hello child process', () => {
// child.disconnect()
})
// 父进程监听子进程的发来的消息
child.on('message', (msg) => {
console.log(msg)
})
console.log('main pid:', process.pid)
```
```javascript
// child
console.log('child process')
console.log('child pid', process.pid)
process.on('message', (msg) => {
console.log(msg)
})
process.send('hello main process')
```
result
```sh
main pid: 2023
child process
child pid 2024
hello main process
hello child process
```
### 命令行交互原理
// TODO 视频跳过了,看完整个项目再回来补。
// TODO 第五章、7-x
### TDD
**Test Driven Development-测试驱动开发**
* 先根据需求写测试用例
* 测试用例全部实现
* 开始写代码实现
* 将测试用例由失败变成通过
**动机**
* 在写用例的过程中,梳理编码思路
* 将编程过程任务化,可以对进度做到更加精确的把握
**好处**
* 对之前的功能更有信心,不会怕新功能搞坏了老功能
* 重构更方便了
### vue 三种实例
1. vue2
* 每个 Vue 应用都是 new Vue 函数创建的一个新的实例
* 创建的时候将 data 作为 property 添加到响应式系统中
2. vue3 application instance
* createApp 创建一个 **Application Instance**
* 应用实例用来注册应用中的全局内容
3. vue3 component instance
* createApp ,root component
* mount方法
* 将应用实例挂载到 DOM 节点上
* 返回的不是应用实例,二十组件实例(同Vue2)
### vue3 通信方法
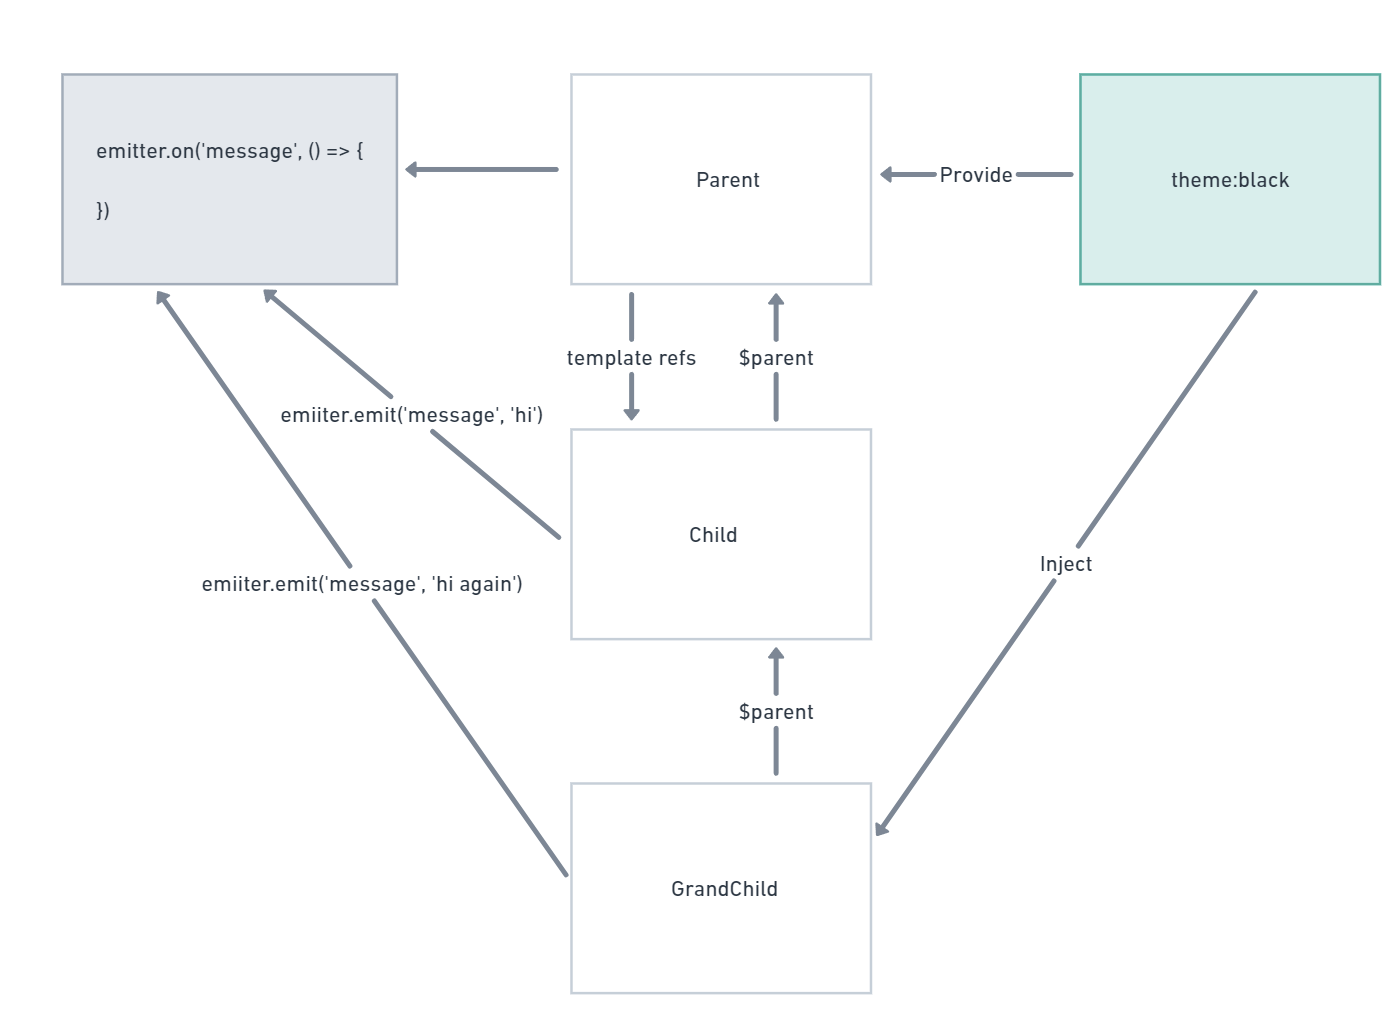
1. 父组件访问子组件实例
https://cn.vuejs.org/guide/essentials/template-refs.html#ref-on-component
```vue
```
2. 子组件访问父组件实例
```vue
```
* 直接调用父组件上的方法和函数,这是一种很不好的做法。
* 应该保持单向数据量,子组件发送特定事件去触发父组件的改变。
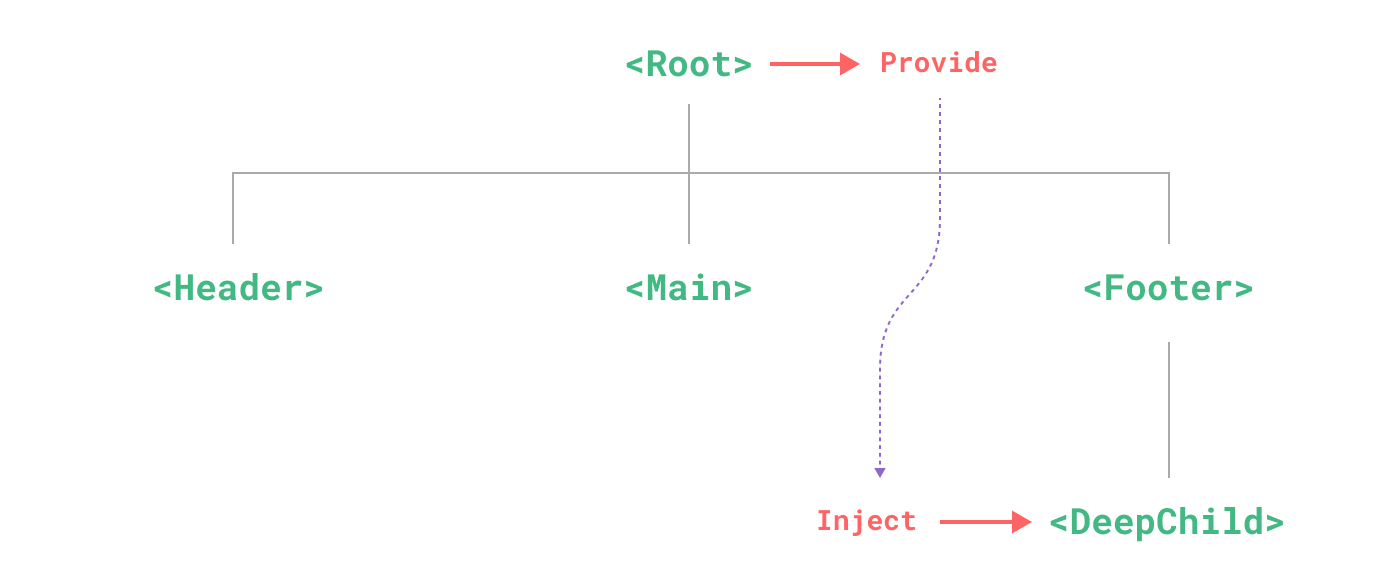
3. provide 和 inject
https://cn.vuejs.org/guide/components/provide-inject.html
```js
import { createApp } from 'vue'
const app = createApp({})
app.provide(/* 注入名 */ 'message', /* 值 */ 'hello!')
```
```vue
```
4. 事件监听器
在以下特殊的情形,需要使用事件监听器完成父子通信
比如,父组件中有 slot,子组件是以 slot 形式存在,无法添加ref
https://www.npmjs.com/package/mitt